One of the most frustrating issues iPhone users face is when their device refuses to connect to WiFi. Whether you're at home, in a cafe, or on vacation, a reliable internet connection is essential, and when your iPhone doesn't connect, it can disrupt your day. There are several reasons why this could happen, ranging from software glitches to network settings. In this comprehensive guide, we'll explore the various causes behind your iPhone's WiFi connectivity problems and tell you how to fix iPhone not connecting to WiFi. Whether your issue arose after a reset, update, or while traveling, we've got you covered.
- Part 1. Why Is My iPhone Not Connecting to WiFi?
- Part 2. How to Fix iPhone Will Not Connect to WiFi Automatically
- Part 3. How to Fix iPhone Does Not Connect to WiFi after Reset/Update
- Part 4. How to Fix iPhone Can Not Connect to WiFi without Losing Data
- Part 5. Conclusion
Part 1. Why Is My iPhone Not Connecting to WiFi?
There are numerous reasons why your iPhone does not stay connected to WiFi. It can range from minor network configuration issues to more complex software glitches. Understanding why your iPhone won't connect can save you time and help you focus on the appropriate solution. Let's look into some frequently asked questions and see if you're in the same issue.
Why Is My iPhone Not Connecting to the WiFi after Resetting?
After resetting your iPhone, it may fail to reconnect to your home WiFi automatically. A reset can cause temporary issues, such as losing saved network information. If you haven't reconfigured your WiFi settings after the reset, or if there are errors in the device's network features, it may prevent your iPhone from connecting to WiFi networks on its own. You can try linking the WiFi manually to resolve this problem.
Why Does My iPhone Not Connect to WiFi after Updating?
Many users experience WiFi connectivity issues after updating to iOS 18 and 17, with some reporting a "no internet connection" message under the WiFi name. Software updates can introduce new features or settings that affect how your iPhone connects to WiFi. The Private Wi-Fi Address feature, which randomizes your iPhone's MAC address for privacy, may be enabled by default. Some routers struggle with this, so turning off this feature and using a fixed MAC address can improve connectivity.
Why Is My iPhone Connecting to 5G WiFi and Not?
If your iPhone connects to 5G WiFi but not 2.4G, or vice versa, the issue may be related to your router's settings or network interference. Many iPhones prioritize 5GHz for faster speeds, but they may not switch to 2.4GHz automatically due to signal distance or interference. Try forgetting the 2.4GHz network to force the iPhone to connect to 5GHz. Also, ensure the 5GHz band is enabled on the router and both devices are within range.
Why Is My iPhone Not Connected to WiFi When Travelling?
When traveling, your iPhone may not connect to WiFi due to differences in network settings or regional restrictions. Many international WiFi networks require specific login credentials or have compatibility issues with certain frequency bands. Additionally, your iPhone might struggle with network configurations or firewall restrictions. Ensure your device is set to use the correct network frequency and check if the network requires a special login or VPN to connect.
Part 2. How to Fix iPhone Will Not Connect to WiFi Automatically
When your iPhone fails to connect to WiFi automatically, it can be an annoying setback. The issue could be related to minor settings, network interference, or a temporary software glitch. To ensure your iPhone connects automatically to available networks, you can try the following methods to fix the iPhone not able to connect to the WiFi issue.
Method 1. Restart the iPhone
Restarting your iPhone is often the simplest way to resolve WiFi connection issues. A restart clears temporary glitches so as to reset the device's network configurations and establish a fresh connection with the WiFi network. If your iPhone is stuck in a connection loop or failing to connect properly, a simple restart can often let your iPhone connect to WiFi again.
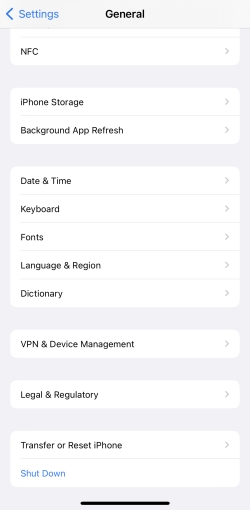
Step 1. Launch the Settings app on your iPhone and go to General.
Step 2. Scroll to the bottom of the General page and tap Shut Down to turn off your iPhone.
Step 3. Press the Side button to restart your iPhone, then try reconnecting to WiFi.
Method 2. Examine the WiFi Router
Sometimes, the issue iPhone will not connect to WiFi might not lie with your iPhone but with the Wi-Fi router itself. Faulty hardware, poor placement, or incorrect settings can cause intermittent or failed connections. Checking the router's configuration, restarting it can resolve the issue. Ensuring the router is working properly can rule out external factors.
Method 3. Enable and Disable WiFi
Next method is to turn your WiFi off and on. This can refresh your connection and resolve minor software bugs causing the problem. This method forces your iPhone to disconnect from the current network and attempt a fresh connection. It's a quick fix that can often solve the iPhone can't connect to WiFi glitches.
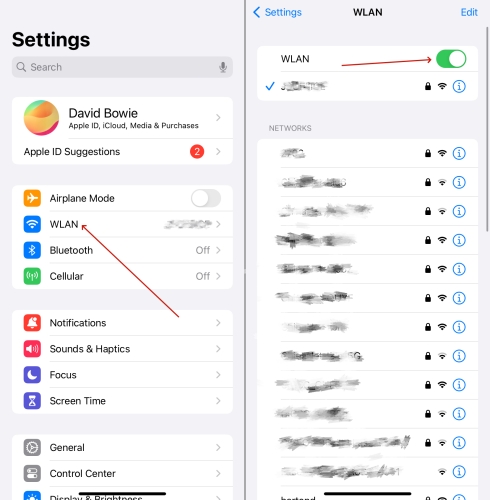
Step 1. Fire up the Settings app and tap the WLAN tab.
Step 2. Then toggle off and on the WLAN switch to refresh the WiFi connection.
Method 4. Disable Private WiFi Address
The Private WiFi Address feature, introduced in iOS 14, randomizes your iPhone's MAC address for privacy. However, some routers may struggle to recognize these rotating addresses, causing connection issues. Here's how to fix the iPhone won't connect to WiFi after updating by disabling the Private WiFi Address feature.
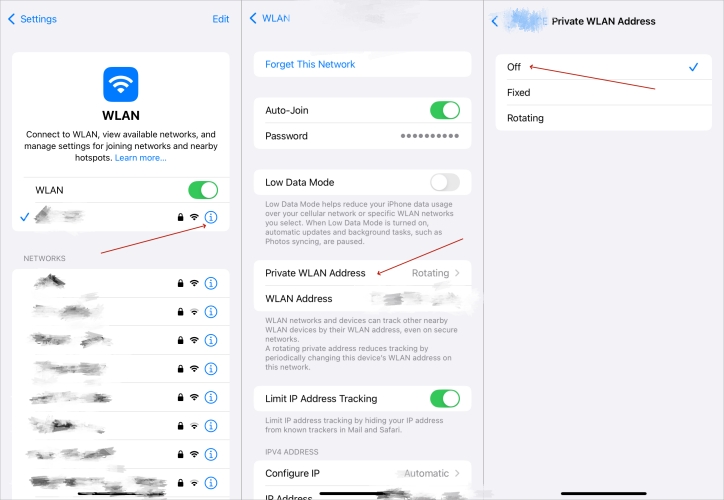
Step 1. Enter Settings and then the WLAN option.
Step 2. Hit the i icon to see more options. Find and tap Private WLAN Address.
Step 3. Next, you can pick the Off option to turn off the Private WiFi Address feature.
Method 5. Turn Off Airplane Mode
Airplane mode can disable WiFi, so if it's accidentally turned on, your iPhone will be unable to connect to any wireless network. Simply turning off airplane mode can resolve this issue. Sometimes, toggling airplane mode on and off can also reset network connections and let your iPhone reconnect to WiFi.
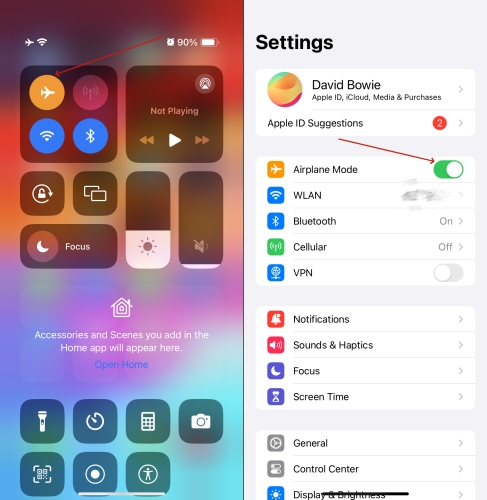
Option 1. Enter the control center. Press the plane icon to turn off the Airplane mode.
Option 2. Go to Setting and toggle off the Airplane mode switch.
Method 6. Forget and Reconnect WiFi
Forgetting a WiFi network and reconnecting can help resolve any issues caused by corrupted or outdated saved network data. This method forces your iPhone to treat the connection as a new one, ensuring that all the network credentials are updated. It's a great way to fix your iPhone not connected to WiFi issue. Here's how to.
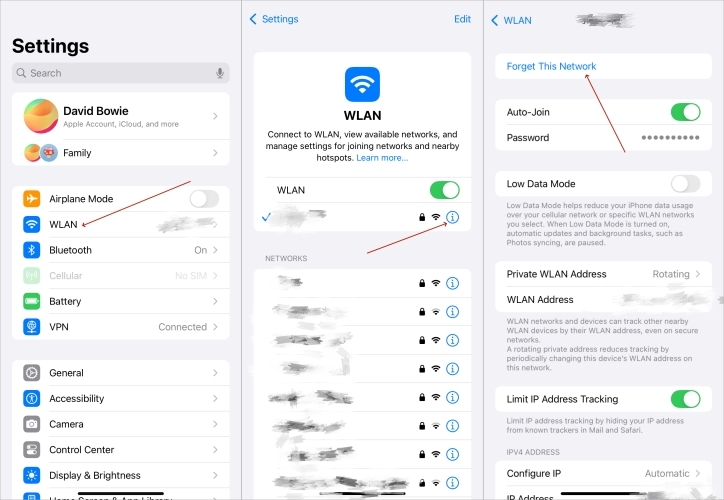
Step 1. Head to Settings and then enter the WLAN section.
Step 2. Touch i and tap Forget This Network on the top.
Step 3. Connect the WiFi one more time by entering the WiFi password.
Method 7. Reset Network Settings
It's the last solution to reset the network settings but can fix stubborn connectivity issues resulted in iPhone not staying connected to WiFi. This action resets all WiFi, cellular, and VPN settings on your iPhone, clearing out any corrupted data that may be hindering your WiFi connection. While this method is effective, it will also require you to re-enter your WiFi passwords after the reset.
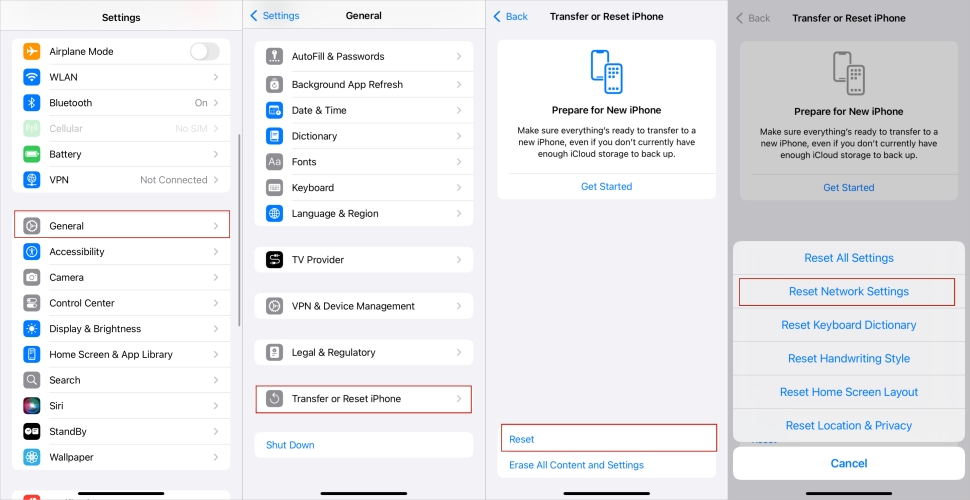
Step 1. Access the Settings app on your iPhone and go to General.
Step 2. Swipe and press Transfer or Reset iPhone. Tap Reset, then choose Reset Network Settings.
Step 3. Input your passcode and confirm the reset. Then the network issue can be fixed.
Part 3. How to Fix iPhone Does Not Connect to WiFi after Reset/Update
When your iPhone fails to connect to WiFi after a reset or software update, the issue may go beyond temporary glitches. A reset can cause the loss of network-related configurations, while a software update might introduce new settings or system files that interfere with connectivity. The following methods can help resolve these issues, but they may result in data loss. If you want to avoid losing data, more efficient solutions are provided in the next section.
Method 1. Reset iPhone in Settings
If your iPhone is not connecting to WiFi after an update, the issue might lie in the network settings. Resetting your iPhone in Settings can restore the device to its default settings and fix any network-related problems caused by system or software errors. It's an efficient method that allows you to fix WiFi connection issues but also results in data loss.
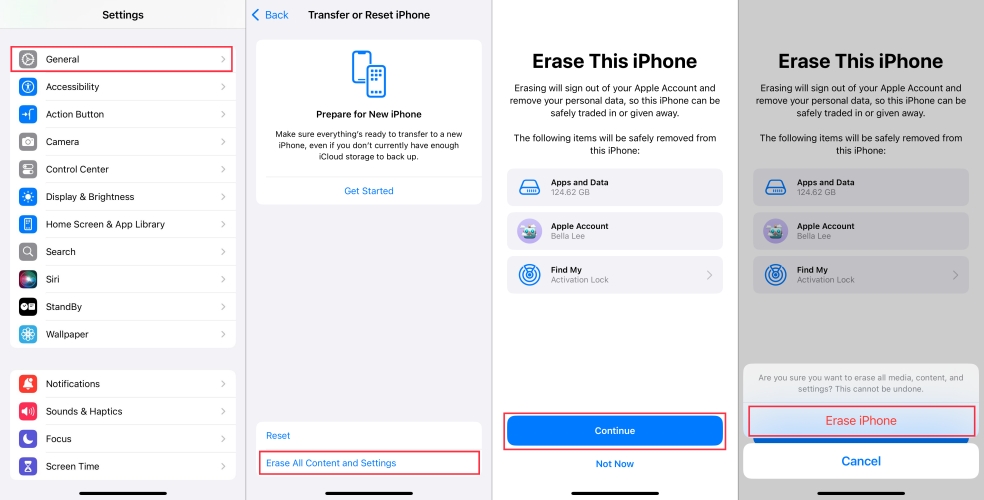
Step 1. Run the Settings app on your iPhone and then switch to General.
Step 2. Scroll down and hit Transfer or Reset iPhone. After that, go to hit Erase All Content and Settings.
Step 3. Type your passcode to confirm when asked and then pick Erase iPhone to begin the factory reset.
Method 2. Restore iPhone via iTunes
Restoring your iPhone through iTunes is a more advanced method if network issues persist after a reset or update. This process restores your iPhone, giving the device a fresh start while erasing all your iPhone data. Restoring via iTunes can fix deeper system-level issues affecting your WiFi connection.
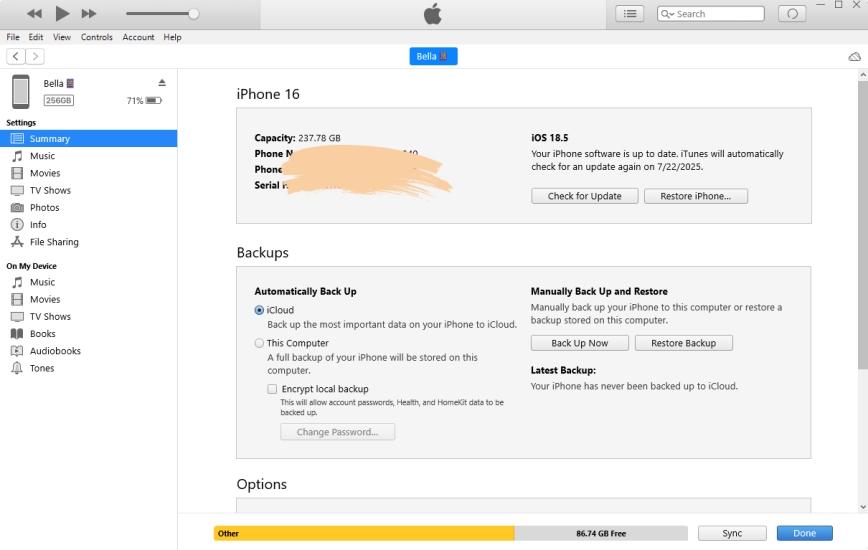
Step 1. Run iTunes on your computer and use a USB to connect your iPhone.
Step 2. Select your iPhone when it appears in iTunes and click Restore iPhone in the Summary tab.
Step 3. Confirm by clicking Restore again, and iTunes will erase all content and restore your iPhone to factory settings.
Part 4. How to Fix iPhone Can Not Connect to WiFi without Losing Data
If your iPhone struggles to connect to WiFi after a reset or update, and you want to avoid the headache of data loss, MagFone iOS System Recovery is your secret weapon. Unlike restoring through iTunes, which erases everything, MagFone offers a non-destructive solution that repairs your iPhone's system without touching your personal files. Whether it's a deep software issue or a hidden bug, MagFone gets your WiFi back on track while keeping your precious photos, contacts, and messages safe. The best part? The entire process is straightforward and efficient——no need for technical know-how. Here's how to use it.
MagFone iOS System Recovery
Fix various iOS and iPadOS system issues, such as black screen, boot loop, frozen screen, or stuck on Apple logo, without data loss.
Step 1 Connect Your iPhone and Access MagFone
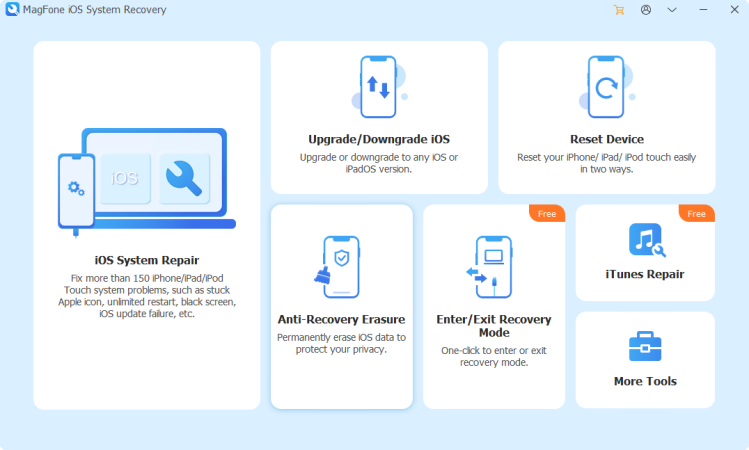
What you need to do first is to link your iPhone to your computer with a USB cable. Once connected, access MagFone iOS System Recovery on your computer and navigate to the iOS System Repair mode. To switch to the next screen, click the Start button.
Step 2 Select Standard Repair Mode to Save Data
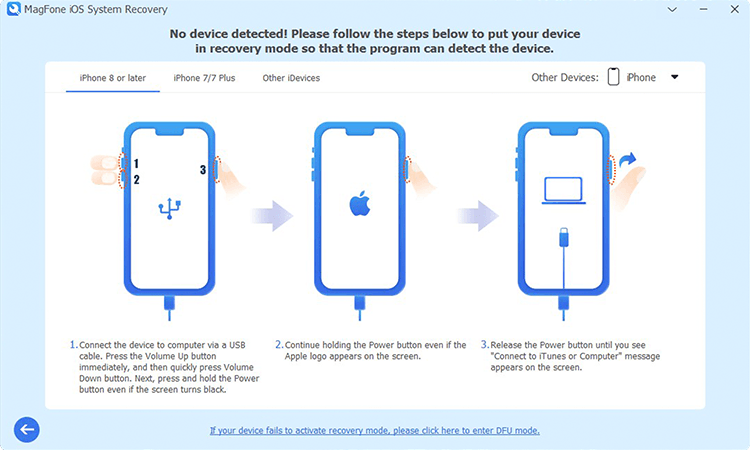
On the next screen, choose the Standard Repair option to fix the WiFi connectivity issue while saving your data. MagFone will automatically detect your iPhone. If the device is not detected, follow the onscreen instructions to put your device into Recovery Mode or DFU Mode.
Step 3 Download the Proper Firmware Package
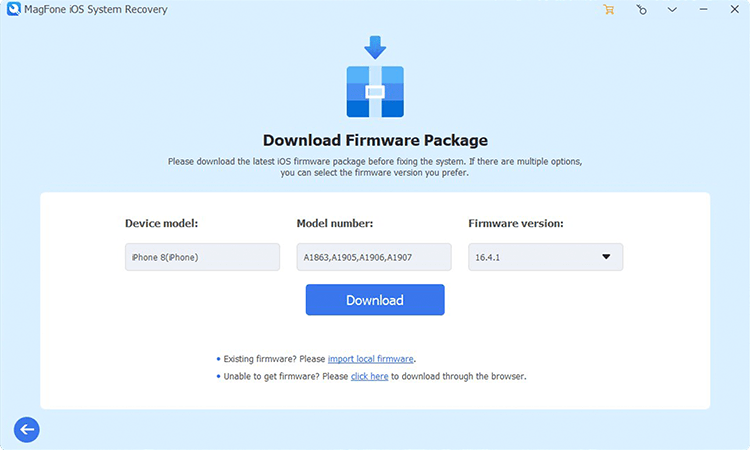
Once your device is recognized, the device information, including model and version, will be displayed on the screen. Verify that this information is correct, then select the appropriate iOS firmware version. Click the Download button to download the latest package for your device.
Step 4 Fix the iPhone Not Connect to WiFi Issues
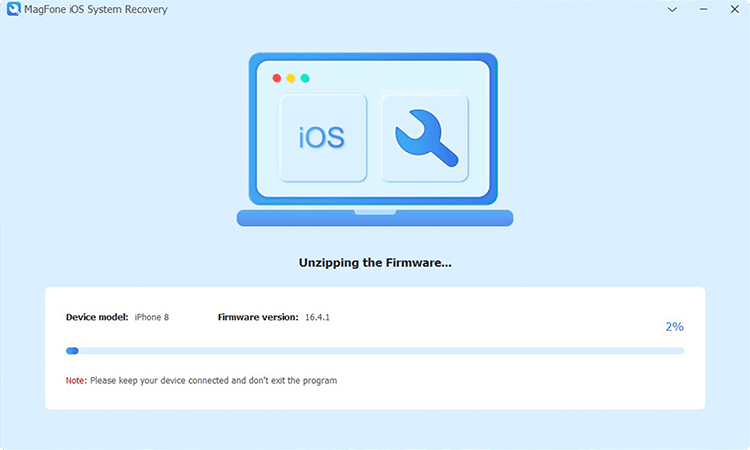
After the firmware has been downloaded, click the Start Standard Repair button. MagFone will unzip the firmware and begin repairing your iPhone's system, addressing the WiFi connection issue. Throughout this process, it's essential to keep your iPhone connected to the computer until you see the Finish prompt.
Part 5. Conclusion
If your iPhone isn't connecting to WiFi, several factors could be at play. Fortunately, this comprehensive guide outlines both common and advanced methods to fix the issue of your iPhone not automatically connecting to WiFi. Whether the problem arises after an update, reset, or while traveling, it can be resolved. For a data-safe solution, tools like MagFone iOS System Recovery offer a non-destructive way to efficiently fix WiFi issues while preserving your personal data.

