Guided Access is an invaluable feature that helps users stay focused by restricting an iPhone or iPad to a single app. However, like any other features on iPhone and iPad, it's not immune to temporary glitches. Issues such as Guided Access being stuck or not turning on or off can occur, affecting your experience. In this guide, the common problems and main causes of Guided Access not working are pointed out. Also, we provide practical solutions to help you fix Guided Access not working on iPhone and iPad.
- Part 1. Common Issues of Guided Access Not Working
- Part 2. Why Is My Guided Access Not Working on iPhone/iPad?
- Part 3. What to Do If Guided Access Is Not Working [Easy]
- Part 4. How to Fix Guided Access Not Working [Advanced]
- Part 5. Conclusion
Part 1. Common Issues of Guided Access Not Working
Guided Access is a powerful tool, but it's not immune to occasional issues. Users may encounter problems like the feature failing to activate, struggling to turn it on or off, or even getting stuck in Guided Access mode. Next, we'll analyze the causes of these common issues and the corresponding troubleshooting methods.
Issue 1. iPhone/iPad Guided Access Not Working and Running
Sometimes, users find that Guided Access is not running as expected, even though it's turned on in the settings app. For instance, the feature might fail to activate when triple-clicking the Home or Side button. Such Guided Access issues often stem from incorrect configurations, software bugs, or hardware issues. You can fix this Guided Access not working and running issue by restarting your device, adjusting the settings, or restoring your device.
Issue 2. Can't Turn On or Off Guided Access on iPhone/iPad
Many users struggle to turn on or off Guided Access on their iPhone and iPad, often due to improper gestures or unexpected system behaviors. For example, attempting to enable Guided Access by triple-clicking the button might instead activate multitasking or split-screen mode. Similarly, turning off Guided Access can sometimes render the device unresponsive, making it difficult to regain control. Understanding how to correctly turn on the Guided Access and reinstall the specific app on your device can help.
Issue 3. iPhone/iPad Stuck or Frozen on Guided Access
One of the more alarming issues is when an iPhone or iPad becomes stuck or frozen in Guided Access mode. Users often find themselves unable to interact with the screen or exit the feature, even with standard button combinations. This can occur due to accidental activation, persistent software glitches, or unresponsive touchscreens. What you can do is restore your iPhone, repair its iOS issues, or get a hardware fix.
Part 2. Why Is My Guided Access Not Working on iPhone/iPad?
Why Guided Access is not working can arise from several underlying factors. Common culprits include iOS bugs and misconfigured settings, which disrupt its functionality. In some cases, an outdated iOS version may also interfere with proper operation. Additionally, corrupted data in certain apps or even hardware malfunctions can contribute to unresponsive Guided Access. It is crucial to find the root causes for applying the right solution. Below, you'll find effective solutions to fix Guided Access not working issues.
Part 3. What to Do If Guided Access Is Not Working [Easy]
If Guided Access is not working on your iPhone or iPad, you can often resolve the issue with some simple steps. These easy fixes are designed to address common problems and help restore functionality quickly, without needing any advanced and complex methods. Here are some straightforward steps to try first.
Method 1. Restart Your Device
One of the easiest ways to resolve Guided Access issues is by restarting your device. A simple reboot can clear minor system glitches and clear temporary files that might be preventing the feature from functioning properly. It's a quick and effective solution to fix the Guided Access not working on iPhone and iPad, making it a good first step.
Method 2. Enable Guided Access Properly
Double-checking the steps for enabling Guided Access ensures that the feature is set up correctly. Simple mistakes during the configuration process can lead to unexpected issues. Ensure you follow the proper gestures and enable the feature in settings.
Note:
After enabling Guided Access, it's important to remember that it only works within apps, not on the Home Screen or other system areas. Be sure to open an app before activating Guided Access for it to function correctly.
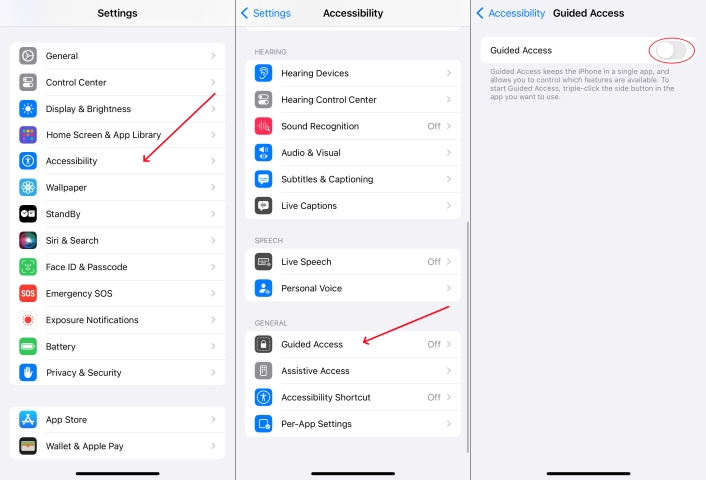
Step 1. Go to Settings.
Step 2. Switch to Accessibility and then scroll down to select Guided Access.
Step 3. Toggle on the Guided Access option to enable this feature.
Method 3. Check Guided Access Settings
Misconfigured settings often cause Guided Access to malfunction. If the Guided Access triple-click not working, checking and adjusting these settings can help resolve common issues. This includes verifying passcode requirements, time limits, and accessibility shortcuts. Next is how to check and change these settings.
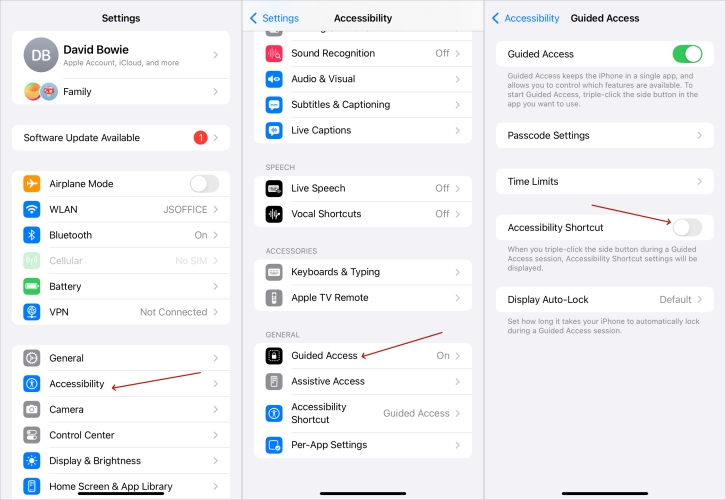
Step 1. Enter Settings > Accessibility. Then tap Guided Access.
Step 2. Then enable the Accessibility Shortcut for easily waking up by buttons.
Step 3. You can also enter Passcode Settings to set the Guided Access passcode and Time Limits.
Method 4. Reinstall a Certain App
Sometimes, the app you are trying to use with Guided Access may be the source of the problem. Uninstalling and reinstalling the app can fix compatibility issues and bugs that interfere with the feature. Just do as follows to reinstall the app.
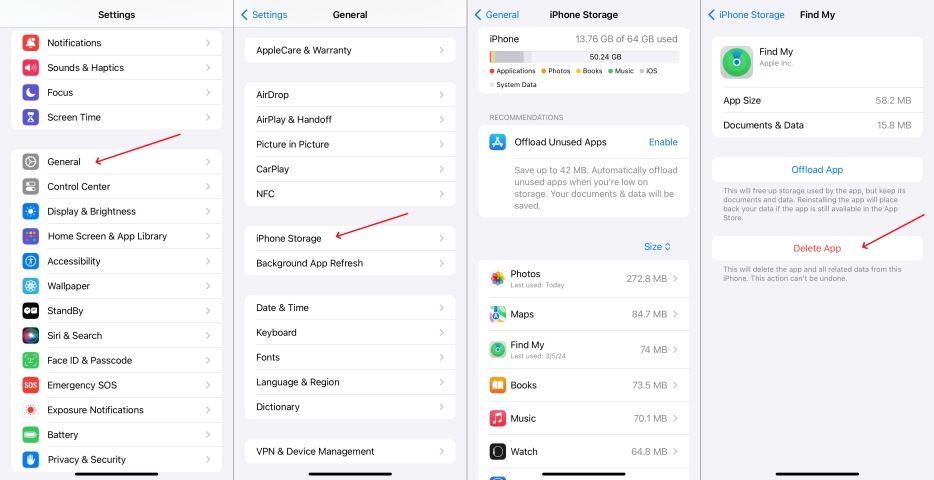
Step 1. Access Settings.
Step 2. Select iPhone Storage and pick the specific app that Guided Access can't work for.
Step 3. Pick Delete App to uninstall this app, then install it in the App Store again.
Method 5. Turn Off the Notification
Notifications can interrupt Guided Access sessions in certain cases, causing them to stop abruptly and not work. Disabling notifications for the duration of your session can help maintain uninterrupted usage.
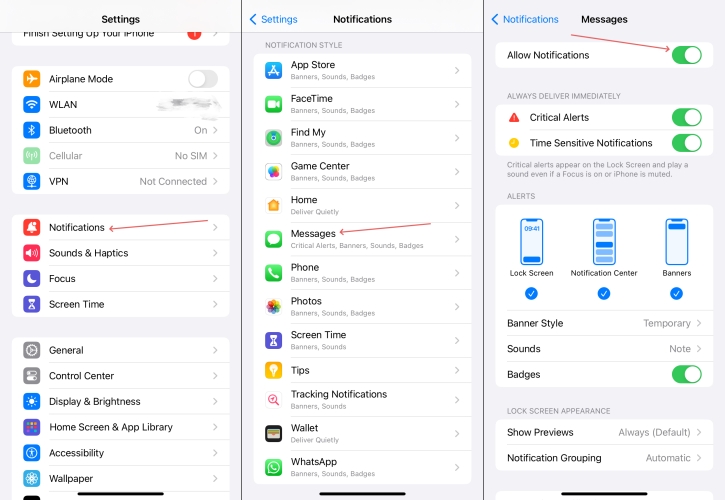
Step 1. Run Settings.
Step 2. Choose Notifications in the list and select the specific app where Guided Access isn't working.
Step 3. Toggle off the Allow Notifications option on this page.
Method 6. Update App and iOS Version
Using an outdated app or iOS version can result in compatibility issues with Guided Access. Regularly updating your software ensures that you have the latest bug fixes and improvements to keep the Guided Access feature working smoothly.
Update Apps:
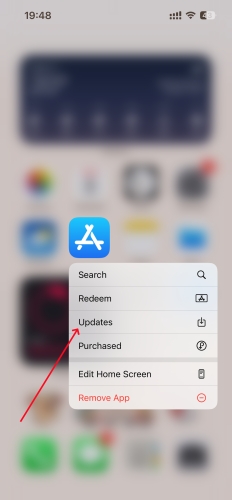
Step 1. Locate the App Store on the home screen.
Step 2. Press and hold the App Store icon, then tap Updates to access the updates section.
Step 3. Choose Update All or select Update next to the app to update the apps.
Update iOS:
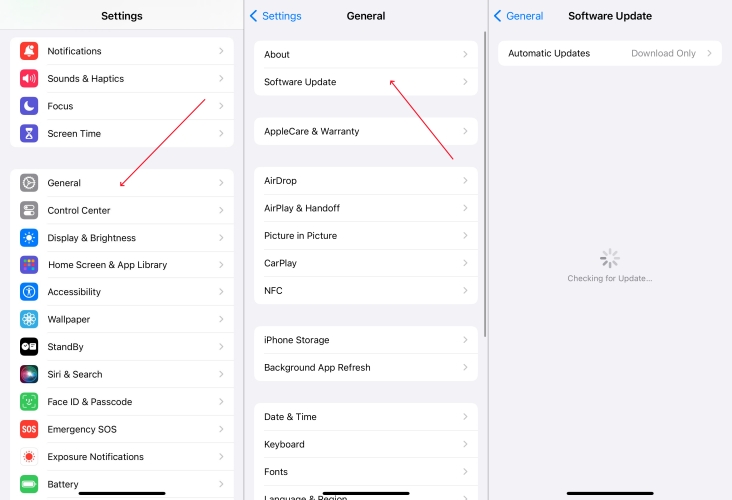
Step 1. Head to Settings.
Step 2. Switch to General and enter the Software Update tab.
Step 3. Press Update Now if a new iOS version is here.
Part 4. How to Fix Guided Access Not Working [Advanced]
In addition to the basic fixes, five advanced troubleshooting methods can resolve Guided Access not working issues. These solutions address deeper, persistent system problems, with data-saving options included. Let's dive into more details now.
Method 1. Reset All Settings
Resetting all settings restores your device to its default configurations without deleting personal data. This can resolve persistent issues with Guided Access caused by conflicting settings.
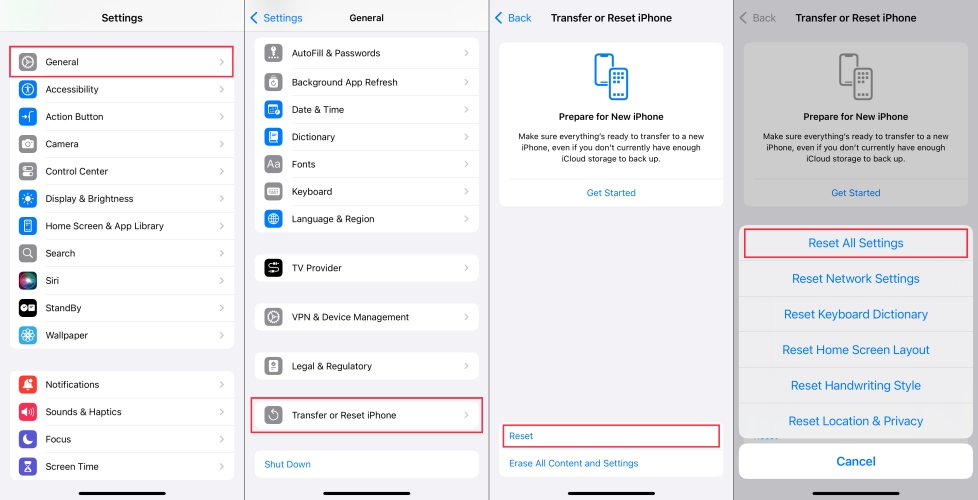
Step 1. Fire up Settings.
Step 2. Navigate to General and then the Transfer or Reset iPhone tab.
Step 3. Continue to touch Reset, and then hit the Reset All Settings choice.
Method 2. Factory Reset Device [Data Loss]
A factory reset erases all data and settings, returning your device to its original state. Although it's effective for resolving the Guided Access stuck and not working issues, you should think twice before do that due to data loss.
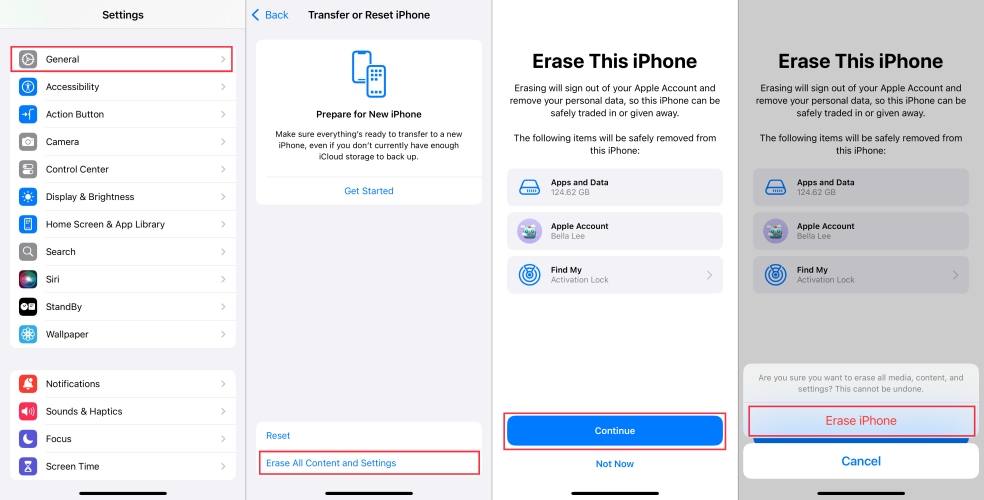
Step 1. Switch to Settings.
Step 2. Touch on the General section, and then choose Erase All Content and Settings.
Step 3. Then select Continue and choose Erase Device again to confirm this erasing action.
Method 3. Restore with iTunes [Data Loss]
It can help fix software-related issues affecting Guided Access by using iTunes to restore your device. However, this method results in data loss, so it's recommended to back up your data before proceeding.
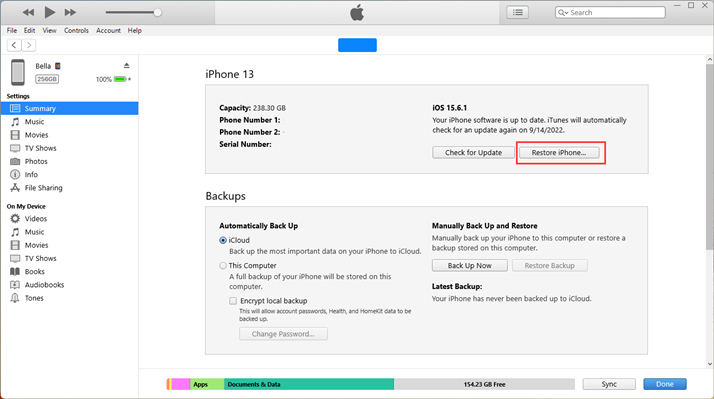
Step 1. Link both your device and a trusted computer and fire up the iTunes on that computer.
Step 2. After clicking your device and entering the Summary tab, find and select the Restore iPhone button.
Step 3. Then you should continue to follow the onscreen guide to finish the restoring process.
Method 4. Repair iOS Glitches [No Data Loss]
Unlike iTunes or factory resets, MagFone iOS System Recovery allows you to fix Guided Access issues on iPhone and iPad, without losing any personal data. It repairs underlying iOS glitches that may be causing the Guided Access feature to malfunction, providing a safer and more convenient option. This tool is the best option if you want to avoid the risk of data loss while resolving the issue efficiently. Whether it's Guided Access not working or Guided Access is stuck, simply connect your device and MagFone will automatically do the rest of the steps to fix the Guided Access issues. Here's how to use it.
Key Features of MagFone iOS System Recovery
* Security Verified. 5,481,347 people have downloaded it.
- Fix various ios issues like screen stuck, mode stuch, and more
- Support updagrading and downgrading iOS without iTunes/Finder
- Offer two modes for resetting iPhone, iPad, and iPod touch
- Assist the entering and exiting of recovery mode for free
Step 1Link iPhone to PC and Access MagFone
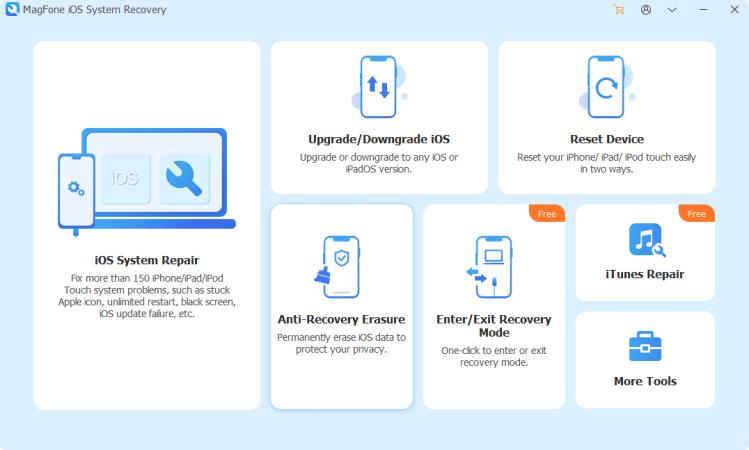
The first thing is linking your iPhone or iPad to your computer using a USB cable. Open MagFone iOS System Recovery on your computer and select the Repair iOS Glitches option. The software will automatically detect your device.
Step 2Select Repair Mode for iOS Repairing
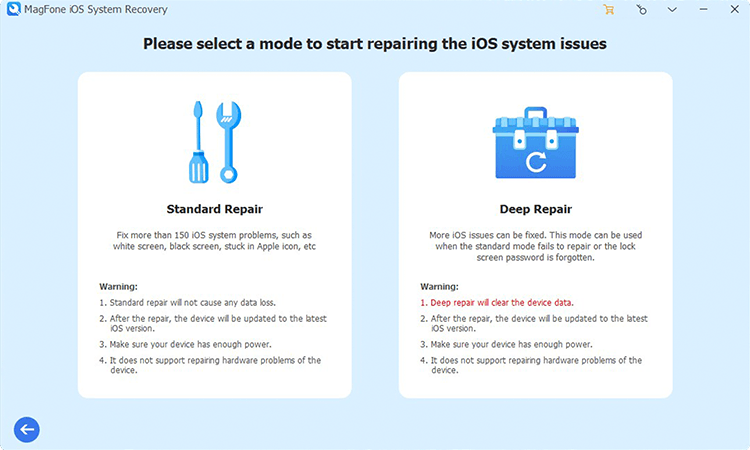
Choose the No Data Loss Repair mode to resolve Guided Access problems. This ensures that the repair process won't cause any data loss. MagFone will guide you through the steps to enter the appropriate mode, whether it's recovery mode or DFU mode.
Step 3 Continue to Get a Firmware Package
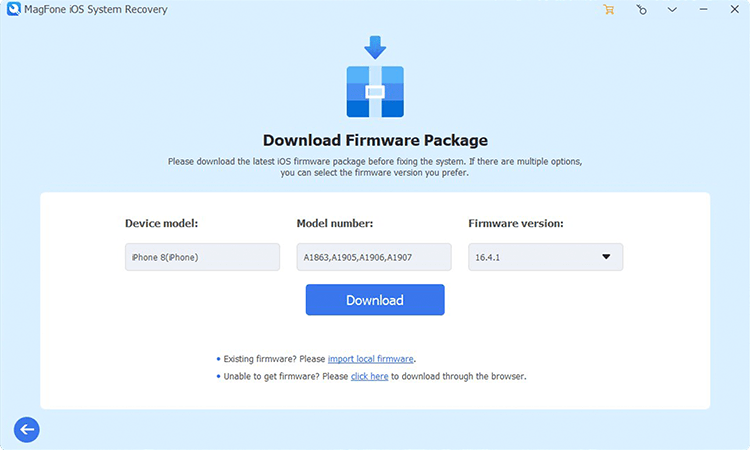
Move on to verify the information displayed on the screen, such as the model and version, and then select the correct firmware package for your device. Click the Download button to begin downloading the firmware needed for the repair process.
Step 4Fix the Guided Access Not Working
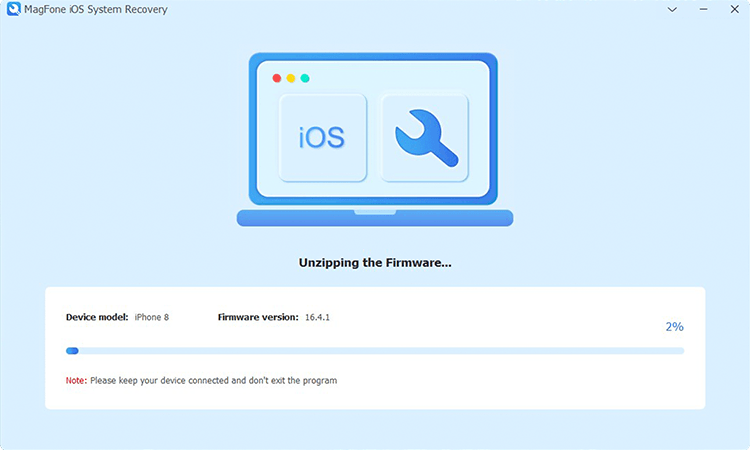
The last step is to click the Start Repair button. MagFone will automatically unzip the firmware and begin repairing your device's iOS system, addressing any Guided Access issues. Keep your device connected to the computer until you see the Finish prompt, Guided issues are fixed now.
Method 5. Contact Apple Support
The last solution is to contact the Apple Support. Their expert technicians can identify more complex software or hardware issues that may be preventing Guided Access from working properly. Apple Support can provide tailored advice or even offer repair services if necessary.
Part 5. Conclusion
Guided Access can sometimes encounter issues, such as failing to activate, malfunctioning during use, or becoming stuck. These problems may arise from misconfigured settings, software glitches, or hardware malfunctions. By understanding the underlying causes and applying the appropriate solutions in this guide, you can fix the issues with Guided Access not working in no time.

