In today's digital age, smartphones store valuable personal information and data. With the rise in smartphone thefts and security breaches, manufacturers have implemented various security features to safeguard users' devices. One such feature is Find My iPhone, designed by Apple to help users locate their lost or stolen iPhones and protect their personal information. However, there are situations where users may need to disable this feature temporarily or permanently. In this article, we'll tell you how to turn off Find My iPhone without password on iOS 7 to 18, while ensuring your privacy and security.
- Part 1. How to Turn Off Find My iPhone without Password [iOS 7 - iOS 12]
- Part 2. How to Disable Find My iPhone without Password [iOS 12 or Later]
- Part 3. How to Disable Find My iPhone with Password
- Part 4. FAQs about Disabling Find My iPhone
- Part 5. Conclusion
Part 1. How to Turn Off Find My iPhone without Password [iOS 7-iOS 12]
In this section, we'll explore the methods for disabling "Find My iPhone" on devices running iOS 7 through iOS 12. Each version introduces new features, so the steps can vary depending on your iOS version. These methods will help you deactivate the feature even if you can't remember your password, offering solutions for early iPhone models and systems with limited security bypass options. To help you navigate, here's a clear introduction table outlining each method.
| Methods | iOS Supported | Difficulty | Evaluation |
|---|---|---|---|
| Delete iCloud Account | iOS 7 | ⭐⭐ | Permanent Way |
| DNS iCloud Bypass | iOS 8 /9 /10 | ⭐⭐⭐⭐ | Temporary Way |
| Erase iCloud Account | iOS 11/12 | ⭐⭐ | Permanent Way |
Method 1. Take Off Find My iPhone by Deleting Account
In iOS 7, the simplest way to turn off Find My iPhone without a password is by deleting the iCloud account from the device. This method effectively removes your Apple ID and all associated data, including Find My iPhone. While it may sound drastic, it's a useful option if you have access to the device settings but can't remember the password.
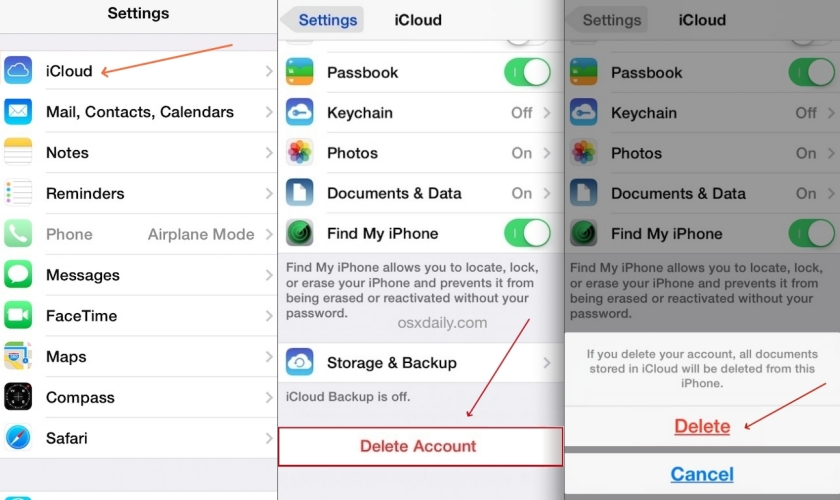
Step 1. Fire up Settings and select iCloud to access your account settings.
Step 2. Tap Delete Account at the bottom of the iCloud settings page. If prompted, confirm the action and proceed. (You may need to repeat this step multiple times if the action doesn't process immediately.)
Step 3. If the device freezes or becomes unresponsive during the process, press and hold the Power button until the iPhone turns off.
Step 4. Wait a few seconds, then turn your iPhone back on by holding the Power button again.
Step 5. Once the device restarts, go back to Settings and navigate to iCloud. Tap Delete Account once more and press Delete to comfirm.
Step 6. The Find My iPhone feature should now be disabled and the Apple ID from the device.
Method 2. Switch Off Find My iPhone via DNS
For iOS 8 to 10, one possible workaround is using DNS settings to bypass the password requirement and deactivate Find My iPhone. This method involves changing the DNS configuration on your device, which may trick the system into disabling the feature temporarily. It's important to note that you may still face limitations with the iCloud account and it could be temporary.
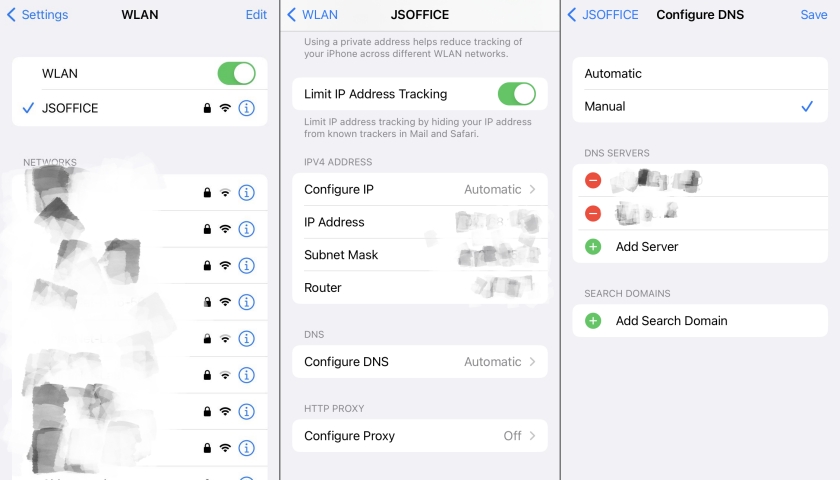
Step 1. Open the Settings app and go to the WiFi section.
Step 2. Find the WiFi network your iPhone is connected to and tap the i (information) icon next to it to access advanced settings.
Step 3. Scroll down to the Configure DNS option and select Manual to enable custom DNS settings.
Step 4. Enter one of the following DNS addresses based on your location.
- Asia: 104.155.28.90
- USA: 104.154.51.7
- Europe: 104.155.28.90
- South America: 35.199.88.219
- Australia and Oceania: 35.189.47.23
- Other Countries: 78.100.17.60
Step 5. Once you've entered the DNS server, tap Save to apply the changes.
Step 6. Return to the WiFi settings and reconnect to the same network. This change should allow temporary bypassing of certain iCloud restrictions, potentially disabling Find My iPhone.
Step 7. Test the changes by going back to iCloud settings and checking the Find My iPhone status.
Method 3. Turn Off Find My iPhone by Erasing Account
In iOS 11 and 12, you have the option to erase your iCloud account to remove Find My iPhone. This is similar to deleting the account in iOS 7, but it also involves resetting your device to factory settings. This method will remove all personal data and settings, including the iCloud account linked to the device. It's an effective solution to turn off the Find My feature.
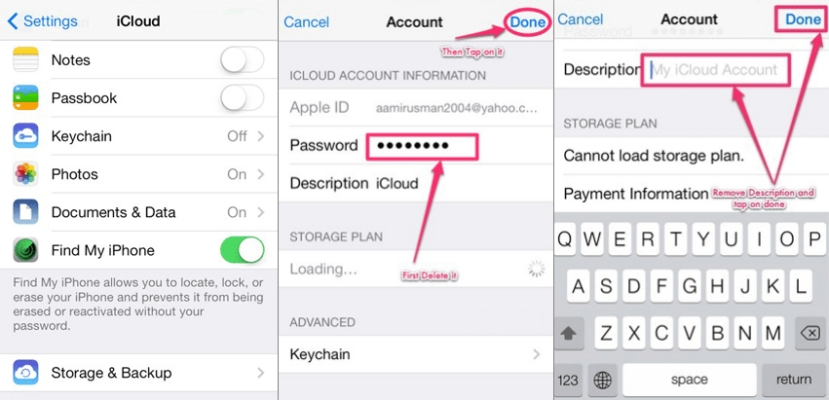
Step 1. Open the Settings app and scroll down to tap on the iCloud option to access the account settings. An interface requesting your iCloud password will appear.
Step 2. Enter a random (incorrect) password in the field and tap Done at the top right corner of the screen.
Step 3. When the system detects the wrong password, it will show an error message. Tap OK, then select Cancel at the top left corner to exit.
Step 4. You'll return to the iCloud settings. Tap on the Account section, then navigate to the Description field and erase its content.
Step 5. Once the Description field is cleared, the iCloud main page will reload, and the Find My iPhone feature should now be disabled.
Part 2. How to Disable Find My iPhone without Password [iOS 12 or Later]
Starting with iOS 12, Apple has made it more difficult to disable Find My iPhone without a password. However, there are still methods that can help you bypass the password protection. Below, we'll walk through methods for iOS 12 and beyond that don't require a password, ensuring that even if you're on the latest software, you can still manage to disable the Find My feature.
| Methods | iOS Supported | Time | Requirement |
|---|---|---|---|
| MagFone Activation Unlocker | iOS 12 to iOS 16.7.5 | Quick | None |
| Contact Apple Support | All iOS | Long | Purchased Credentials |
Method 1. Disable Find My iPhone via Activation Lock Remover
For newer iOS versions, one of the most reliable ways to disable Find My iPhone without a password is by using MagFone Activation Unlocker. This third-party tool is designed to bypass Activation Lock when you've forgotten your Apple ID credentials. It supports iPhones, iPads, and iPod touch running iOS 12 through iOS 16.7.5. MagFone helps bypass the Activation lock and disable the Find My feature while ensuring your device remains fully functional. If you want to turn off Find My iPhone quickly and easily, here is a simple guide for you to follow.
Key Features of MagFone Activation Unlocker
* Security Verified. 5,481,347 people have downloaded it.
- Remove iCloud activation lock without Apple ID and password
- Turn off camera sound on iPhone in some restricted places
- Rescue iPhone from various iCloud activation failure cases
- Turn off Find My iPhone/iPad/iPod touch without password
Step 1Fire up MagFone Activation Unlocker
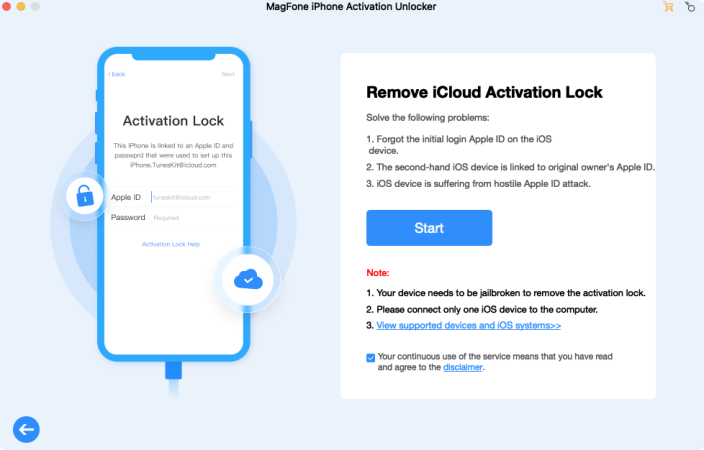
First of all, install and open MagFone Activation Unlocker on your computer, then select Remove iCloud Activation Lock on the home screen. You have to carefully read the claimer and click the Agree button. Proceed to click the Start button and connect your iPhone to your computer via a USB cable.
Step 2Start to Jailbreak iPhone Manually
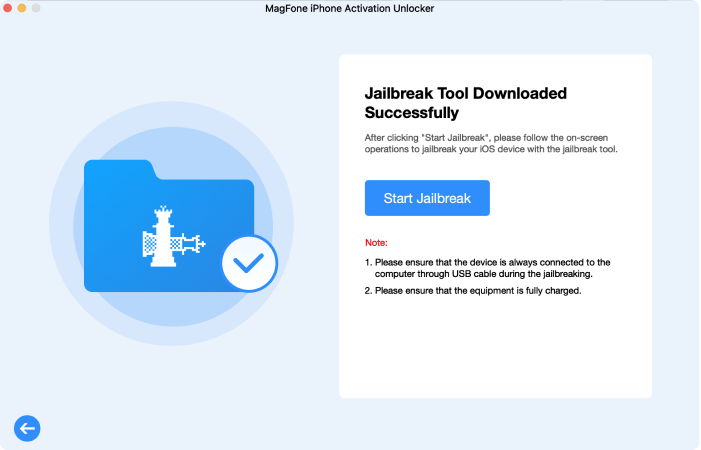
Before disabling Find My iPhone, you have to jailbreak your iPhone on your computer. According to the different operating systems of a computer, the steps to jailbreak an iPhone is different. You can check the detailed activation unlock guide.
Step 3Close Find My iPhone without Password
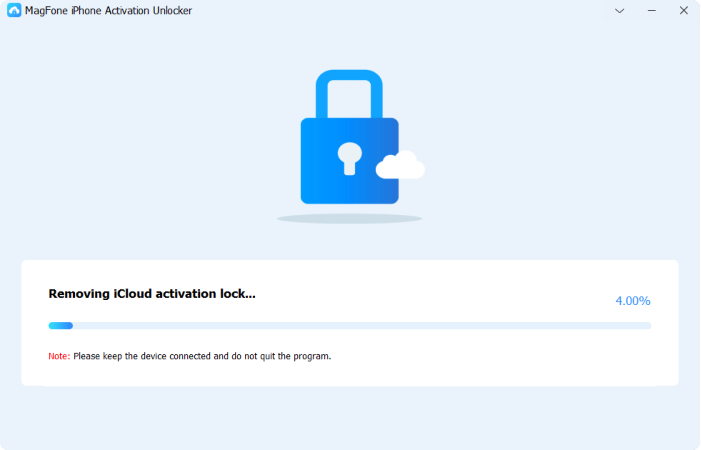
If you have successfully completed the steps to jailbreak your iPhone, you can check the device information displayed on the screen of the MagFone software. Then you can click the Start to Remove button after confirming it.
Method 2. Stop Find My iPhone by Apple Support
If you're unable to disable Find My iPhone yourself, you can always reach out to Apple Support for help. Apple's customer service can assist you with disabling the feature, especially if you provide proof of ownership, such as the device's original purchase receipt. This method works across all iOS versions, ensuring that no matter your device, you can get the assistance you need. You can contact Apple Support through their official website or visit an Apple Store for in-person assistance.

Part 3. How to Disable Find My iPhone with Password
Find My iPhone is a security feature developed by Apple that enables users to locate their lost or stolen devices using GPS technology. All users can easily enable and disable this feature on their devices with their Apple ID passwords. Disabling Find My iPhone is a straightforward process. Here are four ways to do that.
Method 1. Remove Find My iPhone in Settings
The quickest and directest way to remove Find My on your iPhone is to do it in Settings. With your Apple ID password, you can Disable Find My iPhone easily. Here's how.
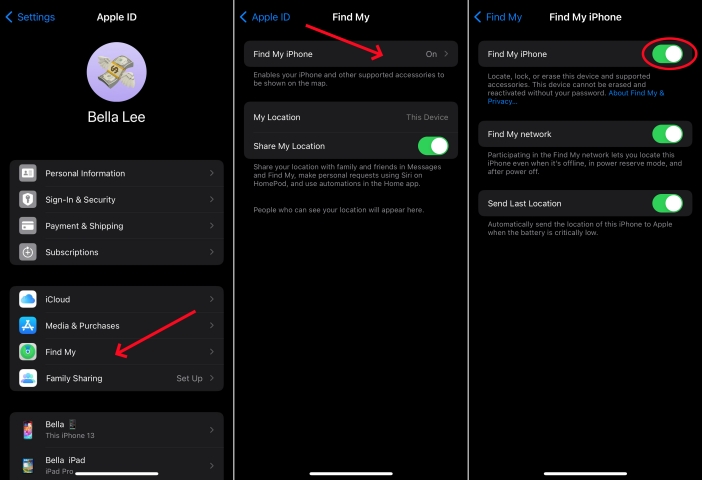
Step 1. On your iPhone, open Settings and tap your Apple ID name.
Step 2. Tap Find My > Find My iPhone, then tap to turn it off.
Step 3. Enter your Apple ID password and tap Turn Off to confirm.
Method 2. Disable Find My iPhone via Find My App
On all Apple mobile devices where you use the same Apple ID, you can use the Find My app to deactivate Find My on your iPhone. Just do the following steps.
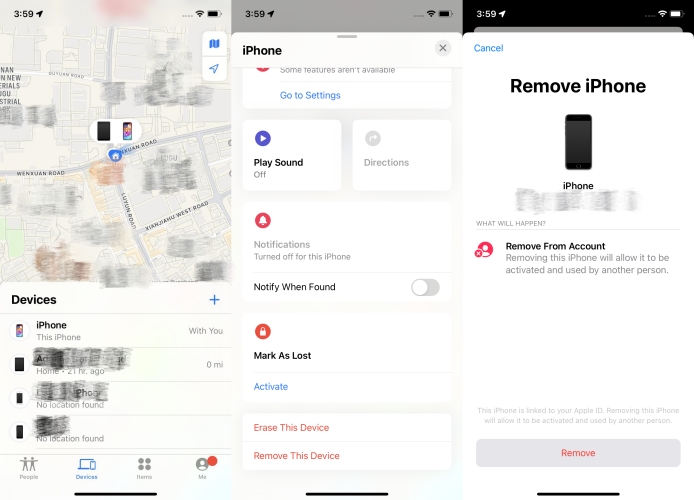
Step 1. Fire up the Find My app on your other Apple device.
Step 2. Tap Devices at the bottom of the screen and view the device list.
Step 3. Select your iPhone and scroll down to tap Remove from Account.
Method 3. Shut Off Find My iPhone at iCloud.com
If you don't have more Apple devices, you can also shut off Find My iPhone on iCloud.com when your device is not with you. Follow the below steps.
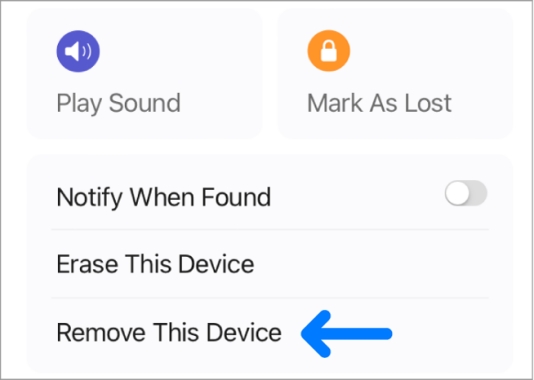
Step 1. Go to iCloud.com and sign in with your Apple ID credentials.
Step 2. In the All Devices list of your Apple ID, find and select your iPhone.
Step 3. Click Remove from Account.
Method 4. Deactivate Find My iPhone on Mac
The last option to deactivate Find My iPhone on your device is to do it on other Apple devices like iPad and Mac. You can follow the below steps to close Find My iPhone on your Mac.
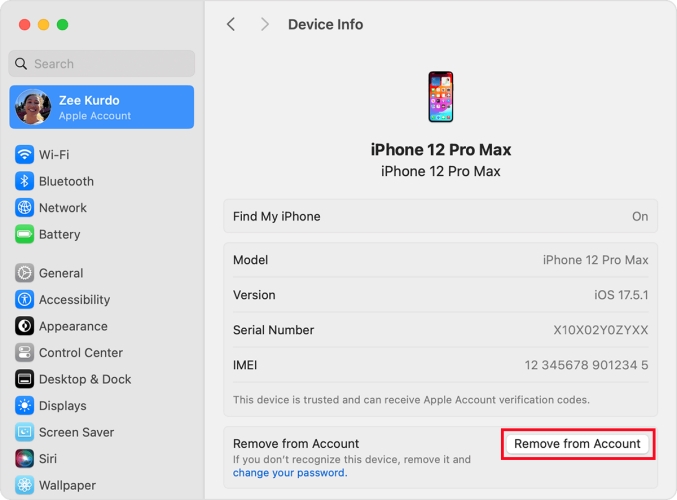
Step 1. On your Mac, launch System Preference and click Apple ID.
Step 2. In the sidebar, find your iPhone and click Remove from Account.
Part 4. FAQs about Disabling Find My iPhone
-
Q1. How to disable find my iPhone from computer?
A: You can disable Find My iPhone from a computer by logging into your iCloud account at iCloud.com. Once logged in, go to Find My iPhone and select your device to remove your device from the device list. What's more, you can also disable the Find My iPhone in the System Preference if you have a Mac beside you.
-
Q2. How to disable find my iPhone on iCloud?
A: If you want to disable Find My iPhone through iCloud, you can log in to iCloud.com, navigate to Find My iPhone, select your device, and choose Remove This Device to turn off the feature. You will need to provide your Apple ID password during this process.
-
Q3. How do I disable Find My iPhone greyed out?
A: If the option to turn off Find My iPhone is greyed out, it typically means that your device is locked. Try contacting Apple Support for assistance or using MagFone Activation Unlocker to deactivate the Find My iPhone on your iPhone with ease. If necessary, you can head to Settings >Apple ID> Password & Security, then switch off Theft Protection.
Part 5. Conclusion
Find My iPhone is a valuable security feature that helps users locate and protect their devices in case of loss and theft. However, there are instances where turning off this feature becomes necessary, such as device transfer or software updates. By trying the solutions introduced in this guide, you can easily disable Find My iPhone on iOS 7 to 18 even though you don't have the Apple ID password.

