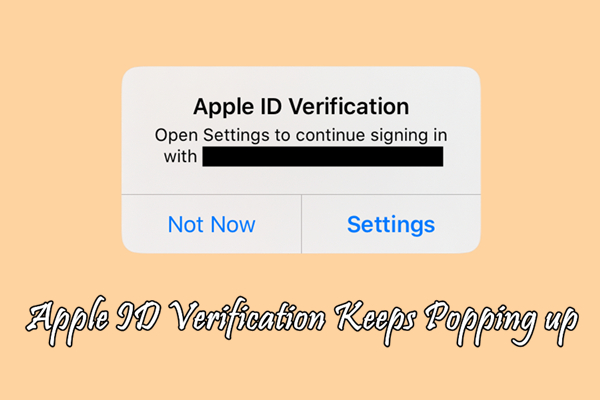
If you are using Apple ID on your iPhone, you may be experiencing a frustrating bug in Apple ID settings where you are repeatedly asked to verify your Apple ID. No matter how many times you enter the password for your Apple ID in Settings, Apple ID verification keeps popping up on iPhone. It would be very annoying because it doesn't let you open barely any app on your iPhone.
Thankfully, there are a few solutions you can try to solve Apple ID asking for verification from time to time. Don't fret as all of the methods are easy to follow and aren't particularly taxing. In this article, we will take you through the detailed steps, and you'll know how to stop Apple ID verification pop up on your iPhone as soon as possible. Let's check it out now!
- Part 1. Why Does Apple ID Verification Keep Popping Up?
- Part 2. How to Get Apple ID Verification to Stop Popping Up
- Method 1. Force Reset iPhone
- Method 2. Sign Out and Sign Back Into Apple ID
- Method 3. Change the Password for Apple ID
- Method 4. Update Apple ID Information
- Method 5. Enable Two-Factor Authentication
- Method 6. Update iOS Version on iPhone
- Method 7. Review Payment Information
- Method 8. Reset Network Settings on iPhone
- Method 9. Check for Multiple Devices
- Method 10. Factory Reset iPhone
- Part 3. How to Stop Apple ID Verification Pop Up without PasswordHOT
- Part 4. FAQs about Apple ID Verification
- Part 5. Conclusion
Part 1. Why Does Apple ID Verification Keep Popping Up?
When you first see this bug on your iPhone, you will want to know why Apple ID verification keeps popping up. In fact, it can be caused by a number of known or unknown reasons. The following are the most important reasons that result in Apple ID asking for verification constantly.
1. You have logged into Apple ID with an out-of-date password on your iPhone.
2. There is a technical glitch on your iPhone, or your iPhone needs to be updated.
3. You have done some improper settings on your Apple ID.
Whatever the reason, you will not be able to use some functions or apps on your iPhone due to this pop-up verification. In the following part, you will know how to stop Apple ID verification pop up on your iPhone or iPad.
Part 2. How to Get Apple ID Verification to Stop Popping Up
To prevent Apple ID from asking for verification all the time, those methods would work for you. If you are still experiencing this problem, simply try the steps below.
Method 1. Force Reset iPhone
Rebooting the iPhone could be a method to fix various bugs, and it's always worth trying first. So, when you see the pop-up Apple ID verification on your iPhone, simply take the following steps.
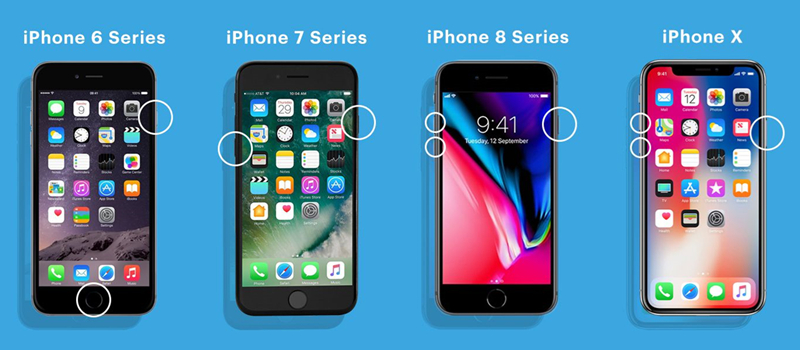
Step 1. On the prompt of Apple ID verification, tap the Settings button.
Step 2. Then go to press and quickly release the volume up and down button.
Step 3. Press and release the side button until the Apple logo appears on your iPhone.
Method 2. Sign Out and Sign Back Into Apple ID
You may find that the above method only provides a temporary fix, then Apple ID asks for verification again. If your problem is not solved, signing out of Apple ID may help. Then you can sign into Apple ID on your iPhone again.
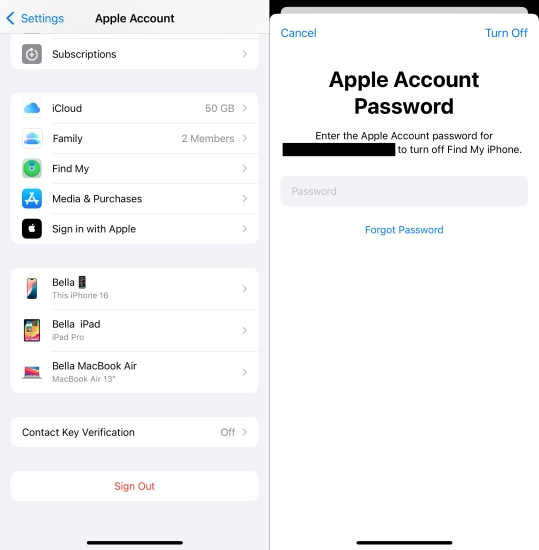
Step 1. Open Settings on your iPhone, then tap your Apple ID name.
Step 2. At the bottom of the screen, tap Sign Out.
Step 3. Enter your Apple ID password and tap Continue.
Step 4. Tap Sign Out again to completely sign out of iCloud.
Step 5. Go back to tap Sign In and enter your Apple ID credentials for signing in.
Method 3. Change the Password for Apple ID
When nothing happens after you try the above methods, you can change the password for your Apple ID. By using a new password for verifying Apple ID, you will not be asked to verify it again and again. Follow the steps below to reset your Apple ID password.
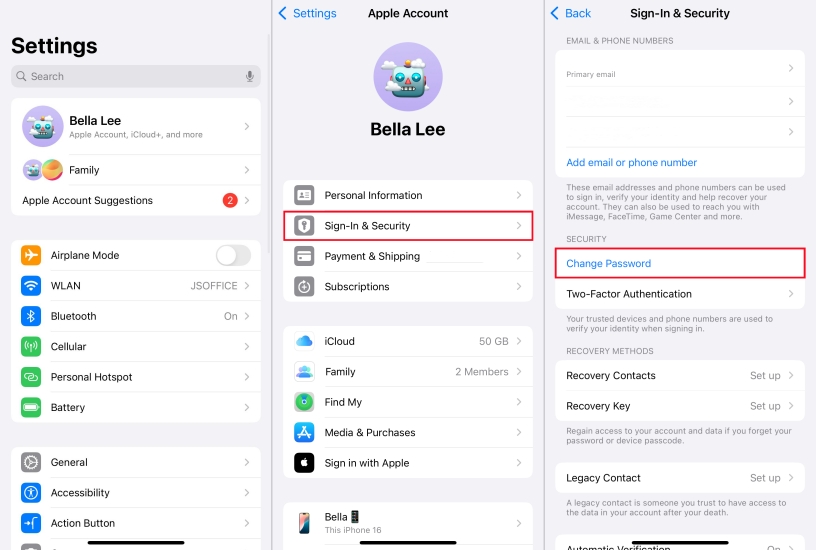
Step 1. Launch the Settings app and tap your Apple ID name.
Step 2. Tap Sign-In & Security > Change Password.
Step 3. Enter your current password if you can remember it.
Step 4. Then type a new password for your Apple ID and confirm it by typing again.
Step 5. Tap Change or Change Password to save your settings.
Method 4. Update Apple ID Information
Make sure all your information, including email addresses and phone number, is up-to-dated on your iPhone. To resolve random Apple ID verification pop up, you can get your information updated by following the steps below.
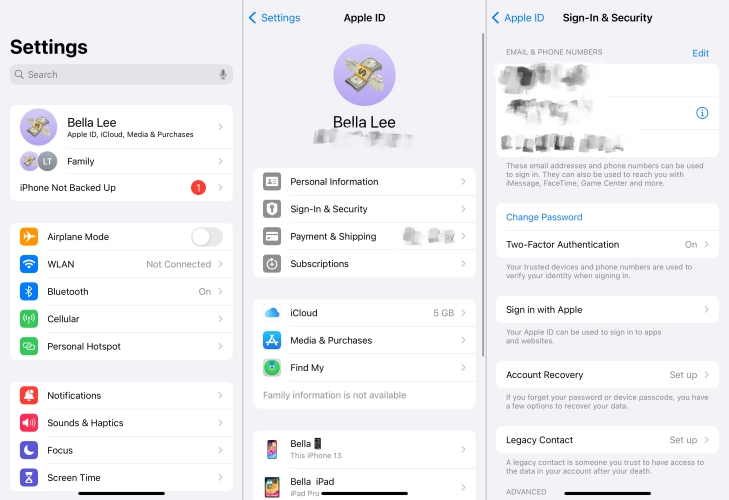
Step 1. Fire up the Settings app and tap your Apple ID name.
Step 2. Tap Sign-In & Security, then review your Apple ID settings.
Step 3. Continue to update your Apple ID information.
Method 5. Enable Two-Factor Authentication
Two-Factor authentication adds an extra layer of security, making it harder for unauthorized users to access your account. To fix Apple ID verification notification keeps popping up, you can enable Two-Factor authentication.
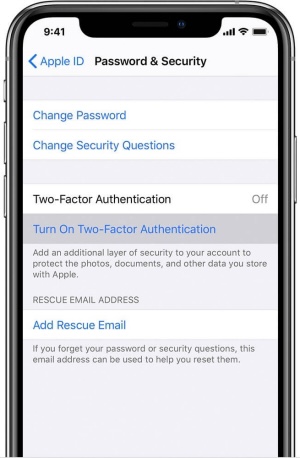
Step 1. Head to Settings > your Apple ID name > Sign-In & Security.
Step 2. Tap Turn on Two-Factory Authentication to enable it.
Method 6. Update iOS Version on iPhone
If you're still getting pestered to verify Apple ID on your iPhone, it's possible that your iPhone needs to be updated to the latest version. If your iPhone is not running the latest version of iOS, you can try updating your iPhone.
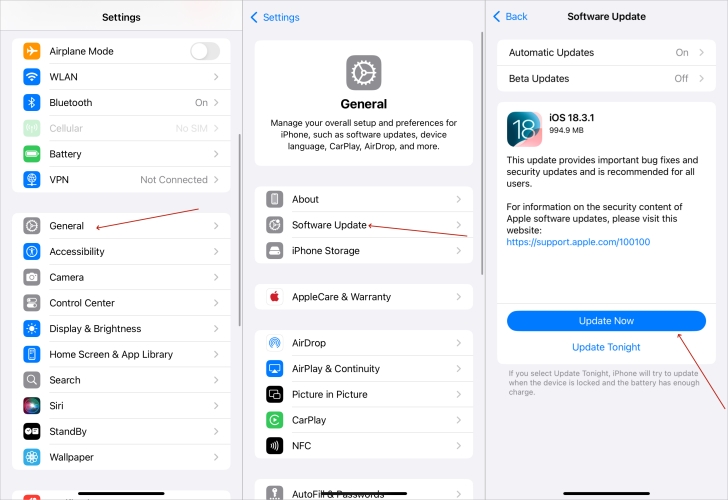
Step 1. Open Settings on your iPhone, then tap General.
Step 2. Tap Software Update and check for your iPhone updates.
Step 3. Select the version of iOS to install and tap Download and Install.
Step 4. After downloading the update, enter your screen lock passcode.
Step 5. Tap Install Now to update your iPhone to the latest version of iOS.
Method 7. Review Payment Information
Incorrect payment details can trigger verification issues. If your payment information on your iPhone is not accurate and up-to-date, you can review and update the payment information. Here's how to update payment details.
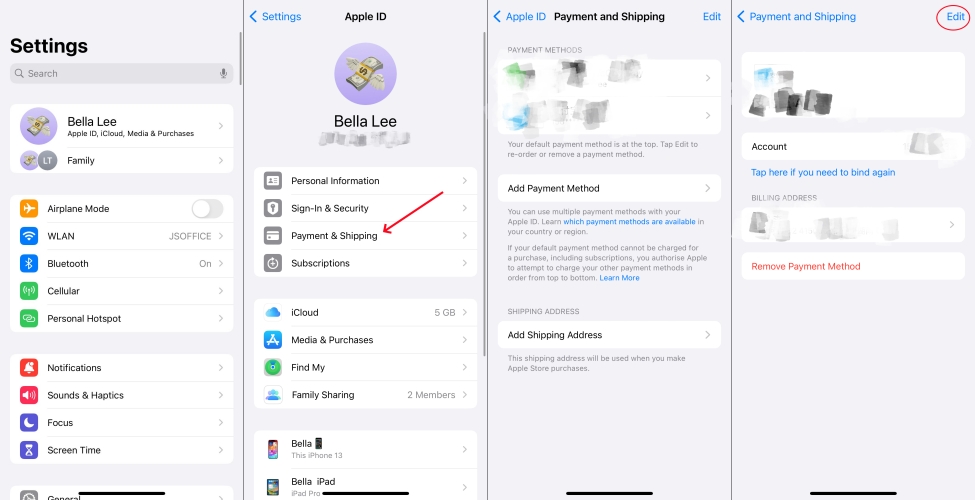
Step 1. In Settings on your iPhone, tap your Apple ID name.
Step 2. Tap Payment & Shipping, then enter your Apple ID password.
Step 3. Select the payment method and tap Edit.
Step 4. Enter your new billing information, then tap Done.
Why I Can't Remove Payment Method on iPhone? Reasons & Fixes!
Unable to remove a payment method from your iPhone? In this guide, we'll walk you through how to remove payment method from Apple ID.
Read More >>Method 8. Reset Network Settings on iPhone
Perhaps, there is a problem with the internet connection on your iPhone. In the case where Apple ID verification keeps popping up, you can try resetting the network settings to solve this problem. Here's how to.
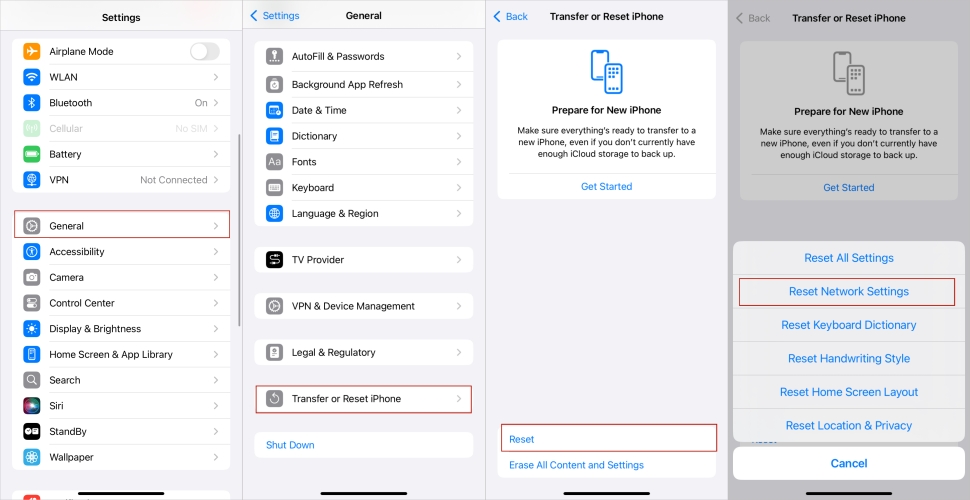
Step 1. Head to Settings > General > Transfer or Reset iPhone.
Step 2. Tap Reset and select Reset Network Settings.
Step 3. Tap Reset Network Settings again to confirm.
Method 9. Check for Multiple Devices
Having multiple devices signed in with the same Apple ID can sometimes cause verification popups. If you have more than one Apple device, you can manage your device with the same Apple ID and remove unnecessary devices.
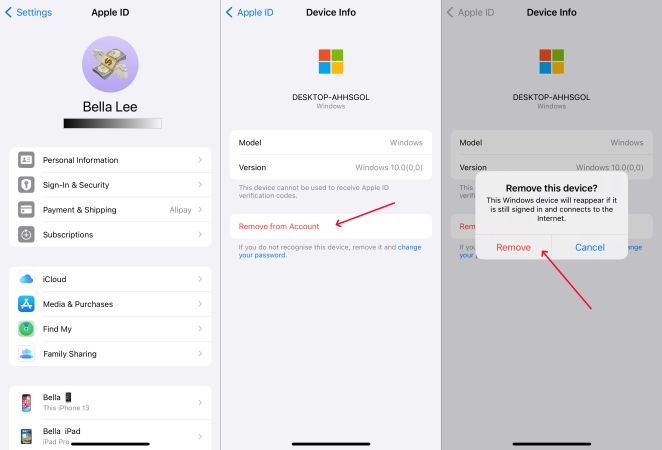
Step 1. On your iPhone, tap Settings > your Apple ID name.
Step 2. Scroll down to Device List and view your device linked with the same Apple ID.
Step 3. Tap any device you no longer use, then tap Remove from Account.
Method 10. Factory Reset iPhone
Maybe the problem of Apple ID asking for verification continuously still bothers you after updating your iPhone. Resetting your iPhone to factory settings and setting it up again could be a fix to this problem.
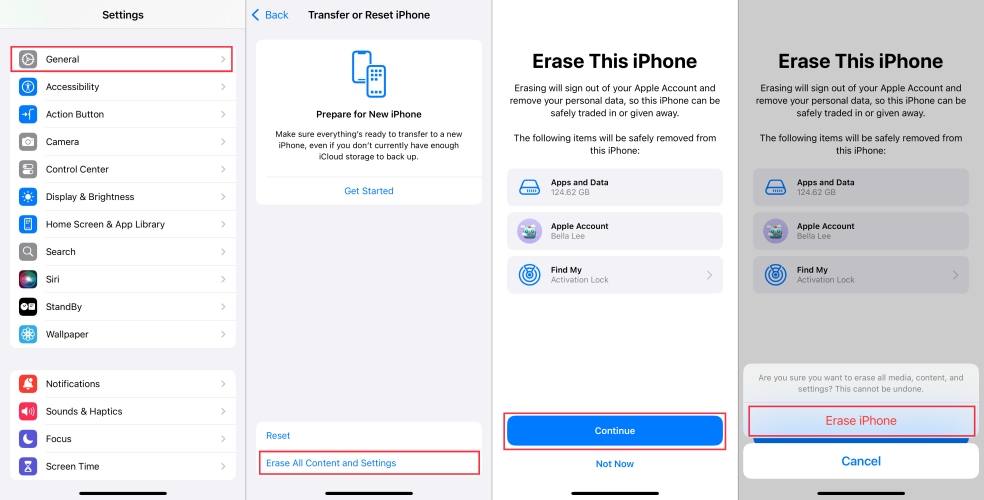
Step 1. Tap Settings > General and select Transfer or Reset iPhone.
Step 2. Under Transfer or Reset iPhone, press Erase All Content and Settings.
Step 3. Tap Continue, then select Skip iCloud Backup or not.
Step 4. You'll be asked for your screen passcode in order to confirm that you want to factory reset your device.
Part 3. How to Stop Apple ID Verification Pop Up without Password
However, you would fail to solve your problem of Apple ID password verification pop-up with the above methods. Or you cannot remember your Apple ID password or other details like email and security questions used for Apple ID. It becomes slightly more complex to solve this problem. Just them, MagFone iPhone Unlocker is a great solution to help you stop Apple ID verification pop up while forgetting your Apple ID password.
As an all-in-one unlocking tool, MagFone iPhone Unlocker can easily remove Apple ID from iPhone, iPad, and iPod touch without entering the password. Apart from that, there are other functions provided by MagFone software. You can use it to unlock various screen locks like Face ID and Touch ID. It's also a snap for MagFone iPhone Unlocker to get rid of Screen Time and bypass MDM restrictions.
Key Features of MagFone iPhone Unlocker
* Security Verified. 5,481,347 people have downloaded it.
- Unlock various screen locks like Face ID and Touch ID on all iOS devices
- Remove Apple ID from iPhone and iPad without password and data loss
- Bypass Screen Time passcode and MDM restrictions without passcode
- Support the latest version of iOS and iPadOS, as well as, iOS devices
Here is a detailed guide you can follow to fix Apple ID asking for verification continuously with the help of MagFone iPhone Unlocker.
Step 1 Connect iPhone and Open MagFone
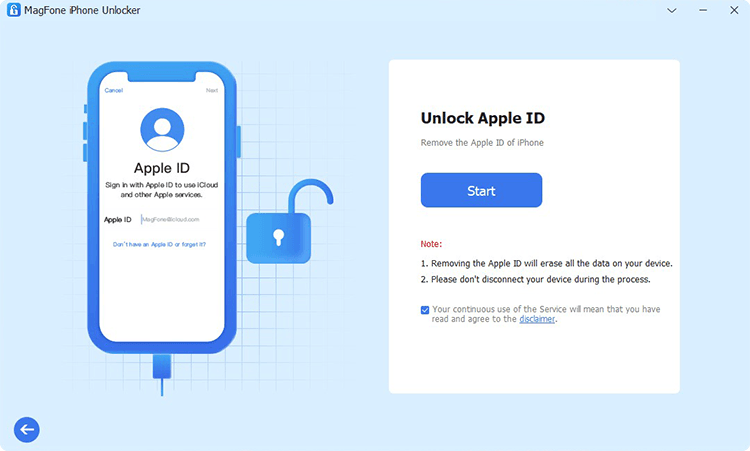
Firstly, use a USB cable to connect your iPhone to your computer. After your device is detected on the computer, open MagFone iPhone Unlocker and select the Remove Apple ID option then click on the Start button.
Step 2 Download the Firmware for iPhone
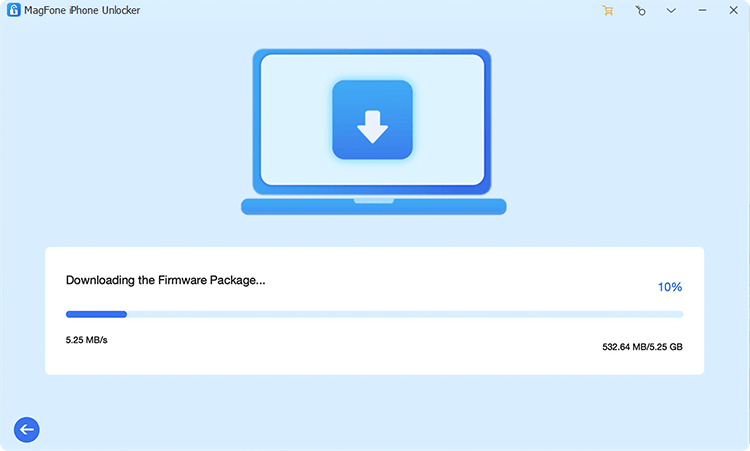
Then you need to download the firmware package for your iPhone. Before that, check the device information carefully, and you can correct the wrong information manually. Then click on the Download button.
Step 3 Fix Apple ID Verification Keeps Popping Up
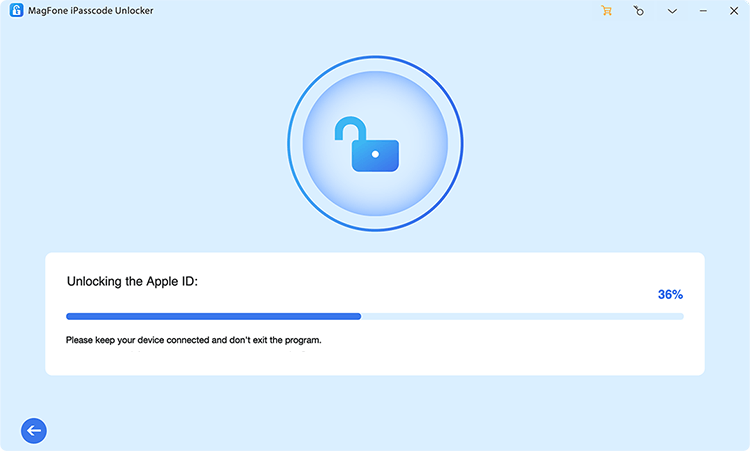
Once you've downloaded the firmware, you can click the Unlock button to let MagFone iPhone Unlocker remove Apple ID from your iPhone. It will completely delete Apple ID on the device, which can help you solve your problem.
Help you unlock an iPhone or iPad without your Apple ID password when Find My is enabled.
Part 4. FAQs about Apple ID Verification
Q1. How to get Apple ID verification code without phone?
A1: Instead of getting a verification code on your iPhone, you can receive it on other Apple devices like Mac or iPad where you use the same Apple ID. You can get a code from Settings on your iPad, Apple Watch, or Mac.
From your iPad or Apple Watch
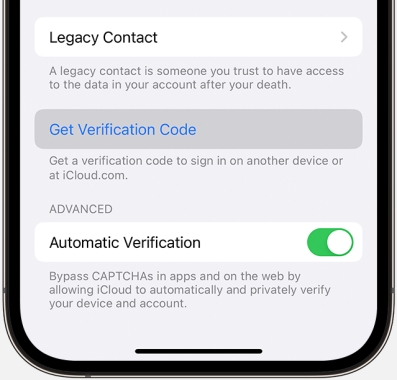
Step 1. Go to Settings > your Apple ID name.
Step 2. Tap Sign-In & Security > Two-Factor Authentication.
Step 3. Tap Get Verification Code.
From your Mac
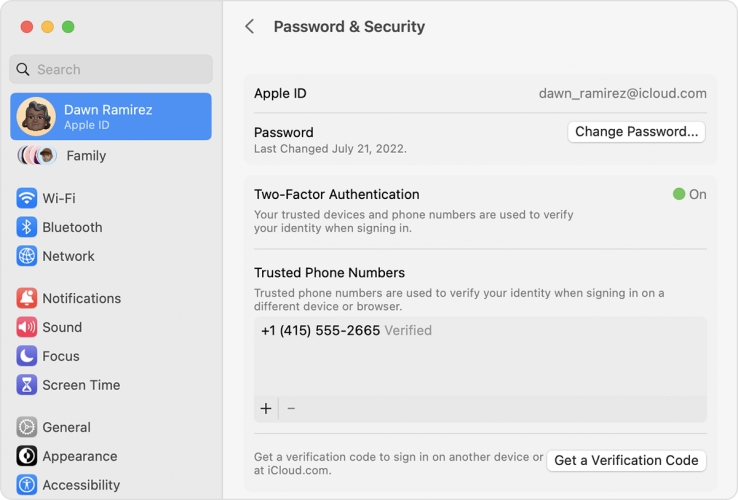
Step 1. Go to Apple menu > System Settings, then click your Apple ID name.
Step 2. Click Sign-In & Security > Two-Factor Authentication.
Step 3. Click Get a Verification Code.
Q2. Why does it say verification failed on Apple ID?
A2: This can happen due to outdated software, incorrect settings, or issues with your internet connection. If you receive a prompt - Verification Failed. An unknown error occur, you can check our guide to resolve this issue.
Q3. How to sign into Apple ID without verification code?
A3: No, you cannot sign into Apple ID without verification code on a new Apple device. If you have signed into Apple ID on your iPhone, you can directly sign in with your Apple ID and password.
Part 5. Conclusion
It's not easy to fix the issue that Apple ID verification keeps popping up on iPhone. But after reading this article, you are able to solve your problem immediately. If you don't want to waste time on such a problem, you can try using MagFone iPhone Unlocker. Hope that you can solve your problem with the methods introduced in our guide. If you have any other questions, leave your comment and provide precise details.

