
If the message "Apple ID Sign In Requested" keeps popping up on your iPhone, iPad, or Mac, you're not alone. This persistent sign-in request message can be frustrating, disrupting your daily usage of Apple services. Fortunately, whether it's a security check, a software glitch, or an Apple ID issue, there are multiple ways to troubleshot and resolve this issue. This guide will cover why this happen and how to resolve it quickly and efficiently.
- Part 1. Apple ID Sign In Requested: Means & Causes
- Part 2. How to Stop Apple ID Sign In Requested Message
- Solution 1. Check Apple's System Status
- Solution 2. Restart Your iPhone
- Solution 3. Verify Your Apple ID Credentials
- Solution 4. Sign Out and Sign Back Into Apple ID
- Solution 5. Reset Network Settings
- Solution 6. Remove Old or Inactive Devices from Apple ID
- Solution 7. Update iOS Software
- Solution 8. Change Apple ID Password
- Part 3. Ultimate Way to Remove Apple ID without Password
- Part 4. Conclusion
Part 1. Apple ID Sign In Requested: Means & Causes
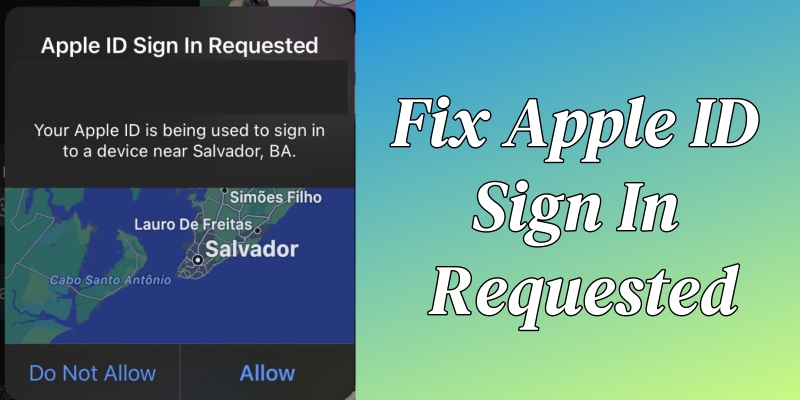
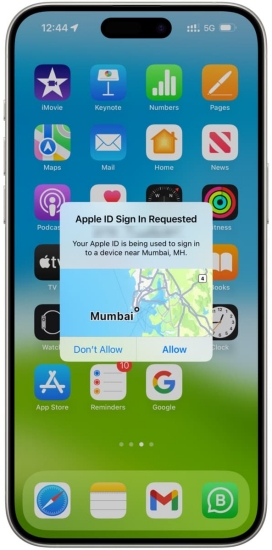
The message saying Apple ID Sign In Requested usually pops up on your trusted Apple device when your Apple ID is used on a new device or browser. It can be a standard security measure or a response to specific triggers since two-factor authentication is enabled. On the pop-up window, you can choose Allow or Don't Allow. Once choosing Allow, your Apple ID will be allowed to sign into the device or browser for use.
Why Do I Keep Getting Apple ID Sign In Requested Message?
It is common to receive the Apple ID Sign In Requested message while using the Apple ID. However, lots of users encounter that the Apple ID Sign In Requested message keeps popping up, which greatly influences the device usage and brings some inconvenience. So, understanding the root cause of this issue can help you choose the right fix. Here are some common reasons.
1) iOS System Updates: After updating your iPhone, Apple may require you to sign in again for security verification.
2) Apple ID Password Changes: If you have recently changed your Apple ID password, the iPhone linked to the account may request authentication.
3) Security Verification: Unusual activity, such as signing in from a new location or device, can trigger repeated sign-in requests.
4) Software Glitches: Bugs in iOS may cause your iPhone to keep asking for Apple ID sign-in.
5) Network Issues: Problems with WiFi or Apple servers can interfere with authentication processes.
6) Expired Sessions: Apple may require you to sign in periodically to keep your account secure.
7) Multiple Apple ID or Devices: Using an Apple ID for different devices or different Apple IDs for various services may cause conflicts.
Part 2. How to Stop Apple ID Sign In Requested Message
After understanding the potential causes of Apple ID Sign In Requested, you can start to resolve this issue with the following solutions. There are multiple solutions to help you resolve the issue quickly and efficiently. Follow the detailed steps below to start.
Solution 1. Check Apple's System Status
If Apple's servers are down, your iPhone might repeatedly request sign-in. In this case, visit Apple's System Status page to check if there are any outage affecting sign-in services.
Solution 2. Restart Your iPhone
Sometimes, a quick restart can clear temporary system glitches and refresh authentication processes. Try turning your iPhone off and on again, then see if the issue persists.
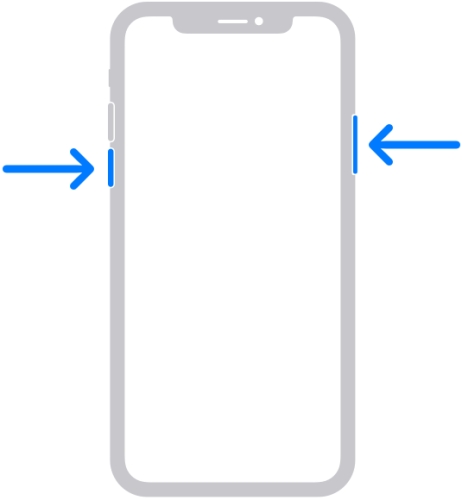
Step 1. Press and hold the volume down and power button until the power-off slider appears.
Step 2. Drag the power-off slider to turn your iPhone off.
Step 3. Wait 30 seconds for your device to turn off.
Step 4. Press and hold the power button again to turn your device on.
Solution 3. Verify Your Apple ID Credentials
Make sure that you are entering the correct Apple ID and password on your iPhone. If you recently changed your Apple ID password, update it across all Apple devices.
Solution 4. Sign Out and Sign Back Into Apple ID
When the Apple ID Sign In Requested message keeps popping up, you can sign out of your Apple ID and then sign back into it on your iPhone again. Follow the steps below.
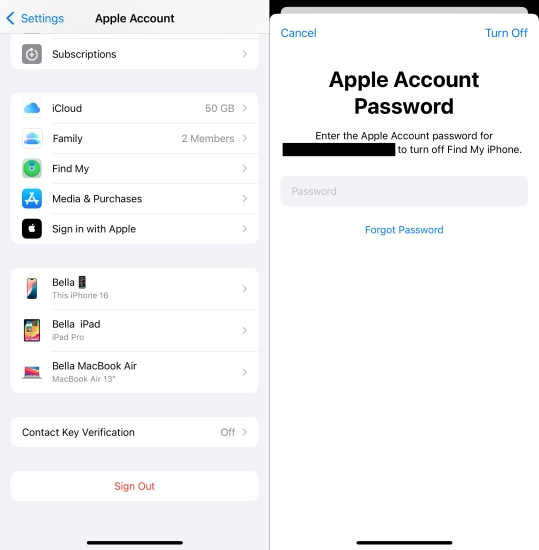
Step 1. Go to Settings and tap your Apple ID name.
Step 2. Scroll down to tap Sign Out and enter your Apple ID password.
Step 3. Tap Sign Out again to confirm the sign-out.
Step 4. Tap Sign In and enter your Apple ID credentials to sign in.
Solution 5. Reset Network Settings
If the issue is network-related, resetting your network settings may help. Resetting network settings on your iPhone won't erase other settings and data.
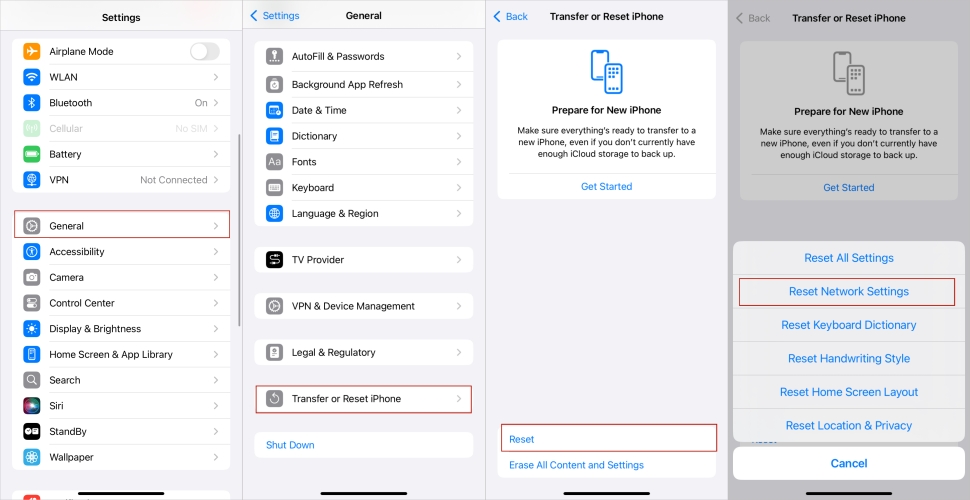
Step 1. Navigate to Settings > General > Transfer or Reset iPhone.
Step 2. Tap Reset and select Reset Network Settings.
Step 3. Reconnect to WiFi and check if the sign-in request persists.
Solution 6. Remove Old or Inactive Devices from Apple ID
If you have more than one Apple devices where the same Apple ID has been used, you can remove those old or inactive devices from your Apple ID. To fix the issue, do the following steps.
On an iPhone or iPad
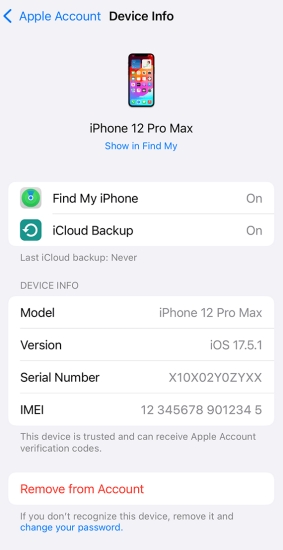
Step 1. Tap Settings > your Apple ID name, then scroll down to view the device list.
Step 2. Find all the device linked to your Apple ID.
Step 3. Tap the old or inactive device to find its details.
Step 4. Tap Remove from Account and tap again to confirm.
On a Mac
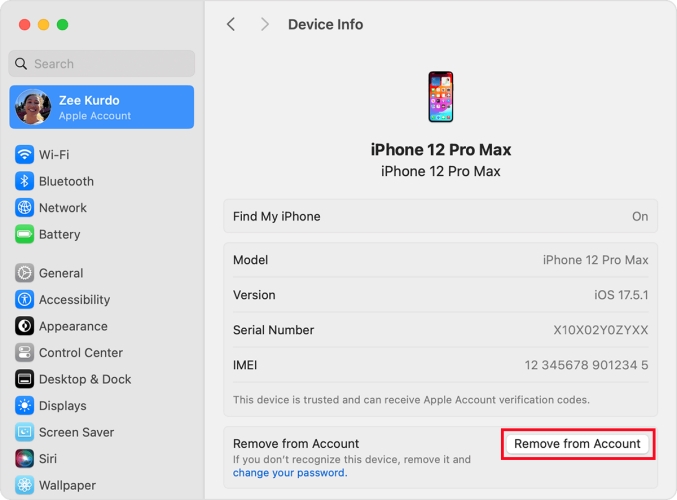
Step 1. Choose Apple menu > System Settings, then click your Apple ID name.
Step 2. View all the device associated to your Apple ID.
Step 3. Click the old or inactive device to find its details.
Step 4. Click Remove from Account and click again to confirm.
On the Web
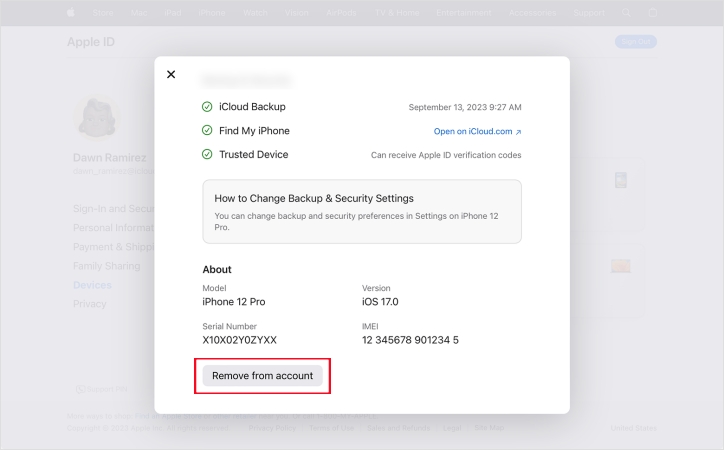
Step 1. Sign in to account.apple.com with your Apple ID and password.
Step 2. Click Devices and select the old or inactive device to view its details.
Step 3. Click Remove from Account twice to confirm that you want to remove the device.
Solution 7. Update iOS Software
Keeping your device software up to date ensures bug fixes and security improvements. When the message keeps popping up, go to check your iOS software and update it.
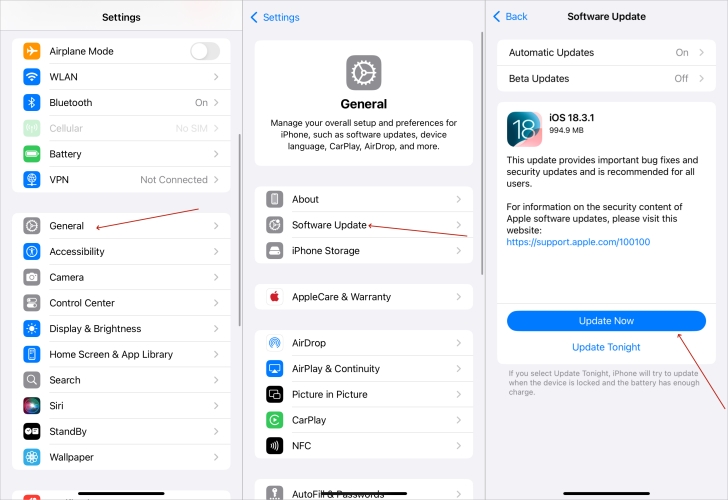
Step 1. Open Settings and tap General >Software Update.
Step 2. Check for updates, then tap Download and Install.
Step 3. After downloading the updates, tap Install Now.
Step 4. Enter your screen lock passcode to confirm.
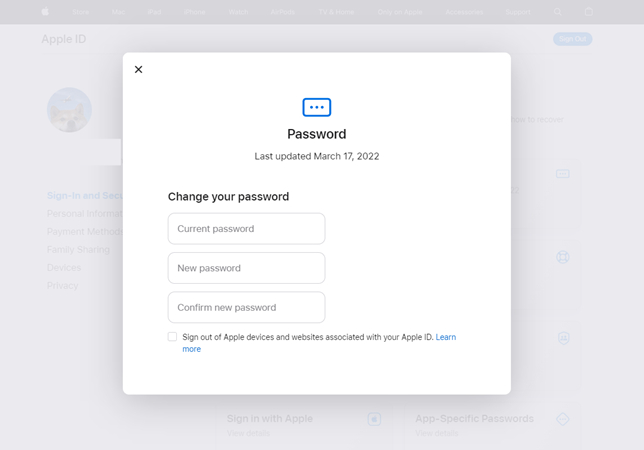
Solution 8. Change Apple ID Password
When someone else tries to using your Apple ID, changing your Apple ID password could be a troubleshooting solution to resolve the issue. Then you won't receive the message anymore.
On an iPhone or iPad
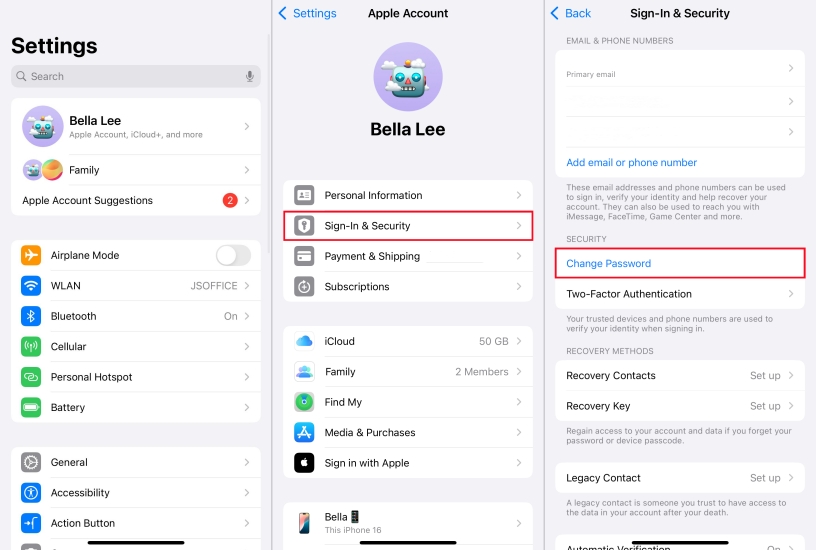
Step 1. In Settings, tap your Apple ID name and select Sign-In & Security.
Step 2. Tap Change Password and create a new password.
Step 3. Tap Change to save your new Apple ID password.
On a Mac
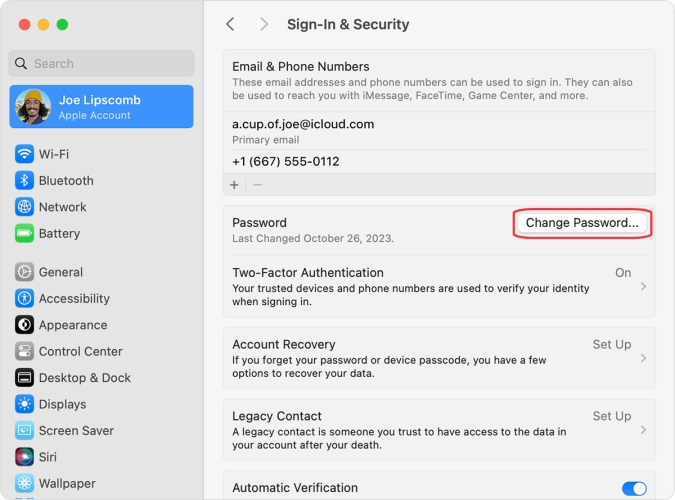
Step 1. Open Apple menu and click System Settings > your Apple ID name.
Step 2. Click Sign-In & Security > Change Password and create a new password.
Step 3. Enter the password again and click OK to confirm.
On the Web
Step 1. Go to appleid.apple.com in a browser on your device and sign into your Apple ID.
Step 2. Tap Allow on the device and enter the verification code to confirm the sign-in.
Step 3. Click the Sign-In and Security tab and select the Password option.
Step 4. Enter your current password, then create a new password for your Apple ID.
Step 5. Tick the box at the bottom of the the window to complete the resetting.
Part 3. Ultimate Way to Remove Apple ID without Password
The absolute worst-case scenario is when the aforementioned methods don't work because you cannot remember your Apple ID details. If this happens to you, one of the above methods work, then you can consider removing Apple ID using an Apple ID removal. MagFone iPhone Unlocker is your best choice if you want to remove Apple ID on your iPhone without a password.
MagFone iPhone Unlocker is a trust-worthy tool that can remove Apple ID on the iPhone, iPad, and iPod touch without a password and data loss. Designed with an intuitive and user-friendly interface, MagFone software can help you remove Apple ID without a password and fix devices stuck in sign-in requests with several simple steps.
Key Features of MagFone iPhone Unlocker
* Security Verified. 5,481,347 people have downloaded it.
- Unlock various screen locks like Face ID and Touch ID on all iOS devices
- Remove Apple ID from iPhone and iPad without password and data loss
- Bypass Screen Time passcode and MDM restrictions without passcode
- Support the latest version of iOS and iPadOS, as well as, iOS devices
Step 1 Run MagFone iPhone Unlocker and Connect iPhonee

Install and run MagFone iPhone Unlocker on your computer, then connect your iPhone to the computer by using a USB cable. There are several options, including Remove Lock Screen, Unlock Apple ID, Remove MDM., and more. Simply select Unlock Apple ID and click the Start button.
Step 2 Check and Confirm the Device Status of iPhone
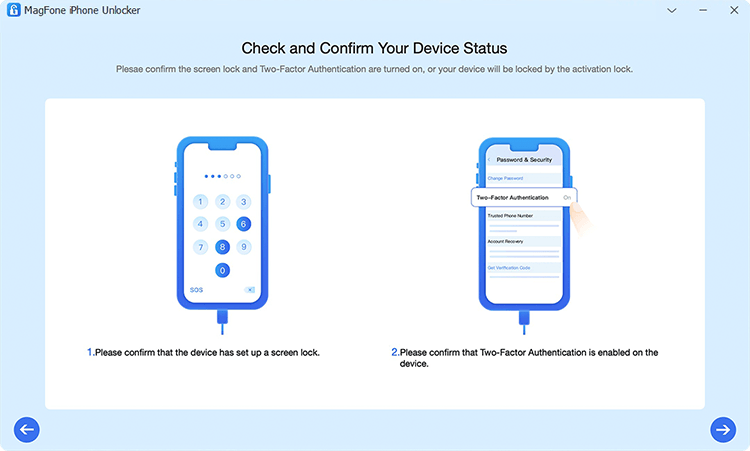
Proceed to turn the Find My feature off if you have enabled it on your iPhone. Tap on Settings > Your Apple ID > Find My > Find My iPhone and then turn Find My iPhone off. If you don't enable this feature on your iPhone, simply directly skip this step.
Step 3 Download and Verify the Firmware for iPhone
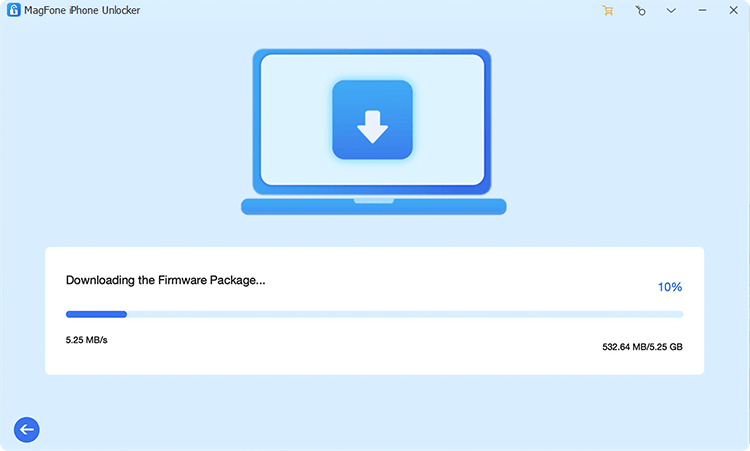
Go back to your computer and check the device information of your device shown on the screen. Make sure there is nothing wrong, then click the Download button to download the firmware package for your device to the computer.
Step 4 Remove Apple ID from iPhone without a Password
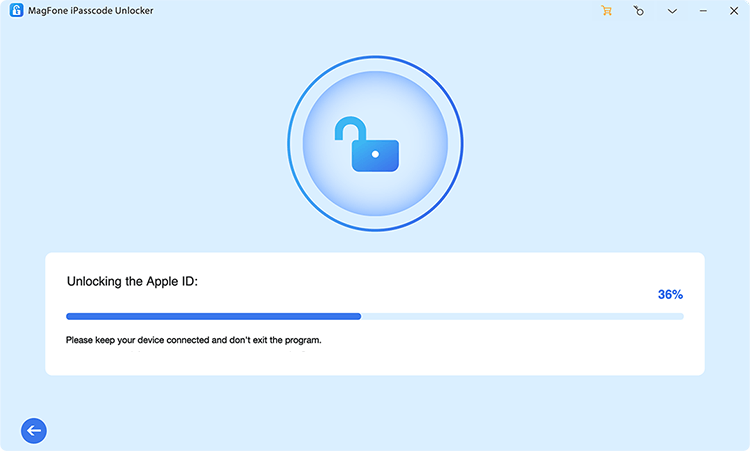
After downloading the firmware, you can click the Unlock button, letting MagFone software to remove Apple ID from your device without a password. In the whole process, keep your device connected to the computer until the task ends.
Part 4. Conclusion
The Apple ID Sign In Requested message can stem from various causes, including security policies, software bugs, or network issues. By following the workable solutions introduced in this guide, you should be able to resolve the problem efficiently. If you are unable to remove Apple ID from your iPhone for bypassing persistent sign-in requests, MagFone iPhone Unlocker can be a last resort to regain access to your device. Have you encountered this issue before? Let us know in the comments below!

Teresa Miller
Editor in chief