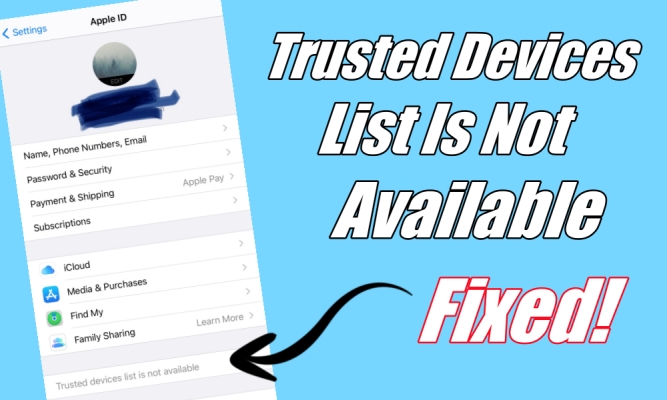
In the ever-evolving landscape of smartphones, the iPhone stands out for its seamless integration of features. Among these features, the Trusted Devices feature plays a crucial role in enhancing user experience and security. However, some user's iPhone says trusted devices list is not available. What to do when your iPhone says trusted devices list is not available? Don't fret! This article delves into the common issue faced by iPhone users: the unavailability of Trusted Devices and effective solutions to fix it.
- Part 1. Why Is Trusted Devices List Not Available?
- Part 2. How to Fix Trusted Devices List Is Not Available
- Part 3. How to Add Trusted Devices on iPhone/iPad/Mac
- Part 4. Bonus Tip: How to Remove Apple ID without Password
- Part 5. Conclusion
Part 1. Why Is Trusted Devices List Not Available?
The significance of Trusted Devices cannot be ignored. This feature allows your iPhone to recognize and connect automatically with Apple devices and other trusted devices. It simplifies your daily interactions, ensuring a smoother connection between your iPhone, iPad, Apple Watch, Mac, or even your Windows PC. Several reasons might cause this issue, including
- iCloud Sync Issues. The device may not be properly syncing with iCloud.
- Outdated iOS Version. Older iOS versions may lack necessary updates.
- Apple ID Verification Problems. If your Apple ID is not correctly verified, the list may not appear.
- Two-Factor Authentication Not Enabled. The Trusted Devices feature requires Two-Factor Authentication to be active.
- Account Restrictions. Some Apple accounts may have restrictions preventing access to the list.
Part 2. How to Fix Trusted Devices List Is Not Available
The good news is that the issue can be fixed in various methods. The following covers the ways to fix 'Trusted devices list is not available', from a simple restart all the way to the nuclear option of resetting your iPhone. Now, let's go through the steps to resolve the problem.
Solution 1. Restart Your iPhone
The first thing you can try is to restart your iPhone. Sometimes, a simple reboot can solve most problems you may already encounter on your device. The steps for restarting your iPhone are as follows.
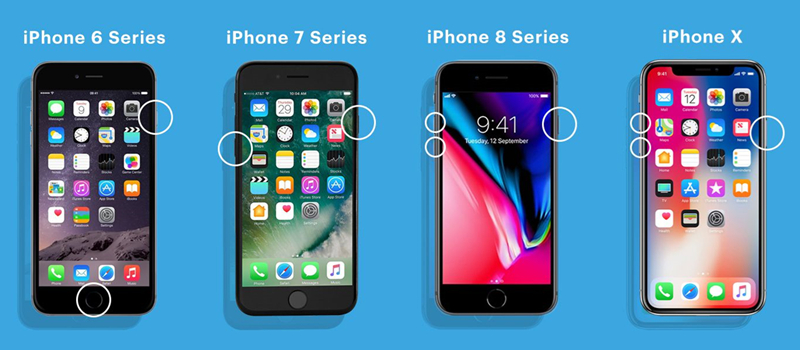
Step 1. Press and hold the power button and either of the volume down button until you see the Slide to power off control.
Step 2. Then drag the slider from left to right and wait at least 30 seconds for your device to completely turn off.
Step 3. Press and hold the power button on your iPhone until the Apple logo appears.
Step 4. Enter your passcode to unlock your device and go to check whether the issue is solved or not.
Solution 2. Reset Network Settings
Make sure that your iPhone is connected to a stable network regardless of WiFi or cellular data. If your device won't connect to a good network, you can reset network settings to address the issue by following the steps below.
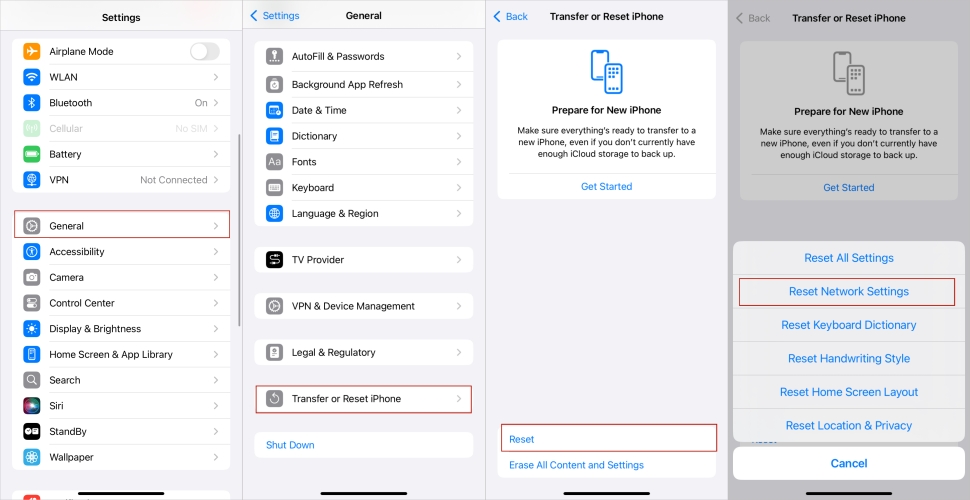
Step 1. Open the Settings app on your iPhone and then tap General.
Step 2. Under General, scroll down to tap Transfer or Reset iPhone.
Step 3. Tap Reset, select Reset Network Settings, and enter your passcode.
Step 4. Tap Reset Network Settings to confirm. Then your device can connect a new network.
Solution 3. Update iPhone to the Latest Version
Ensure your iPhone is running the latest version of iOS. Updates often include bug fixes and improvements that may resolve issues with the Trusted Devices List. You can directly update your iPhone in Settings.
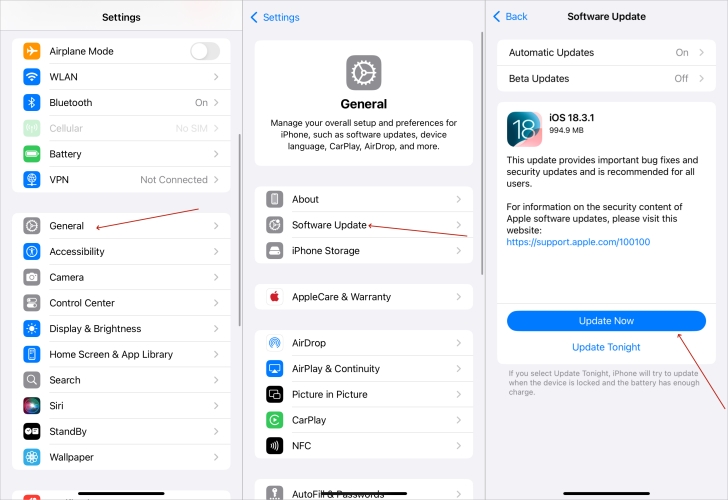
Step 1. Go ahead to Settings and tap General > Software Update.
Step 2. Find an iOS version to update and tap Download and Install.
Step 3. Enter your passcode to download the update, then tap Install Now.
Solution 4. Enable Two-Factor Authentication
If the issue still isn't solved after trying the steps above, the next thing to do is enable Two-Factor Authentication on your iPhone. Ensure Two-Factor Authentication is functioning properly, as it plays a role in managing trusted connections.
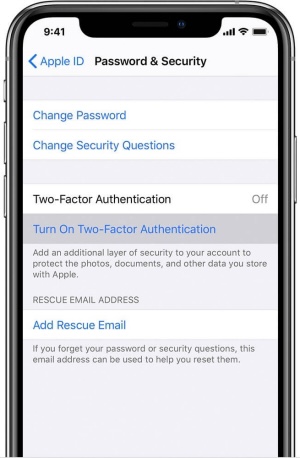
Step 1. On your iPhone, tap Settings > your Apple ID name.
Step 2. Select Sign In & Security and tap Turn on Two-Factor Authentication.
Step 3. Tap Continue, then enter your trusted phone number and tap Next.
Step 4. Enter the verification code you receive on your iPhone. Then your device is a trusted device, and you'll see a list of trusted devices.
Solution 5. Sign out and Sign into Apple ID
Sometimes, signing out and back into Apple ID can refresh system settings and resolve issues with the Trusted Devices List. When you find that your iPhone says trusted devices list is not available, you can sign out and sign into your Apple ID.
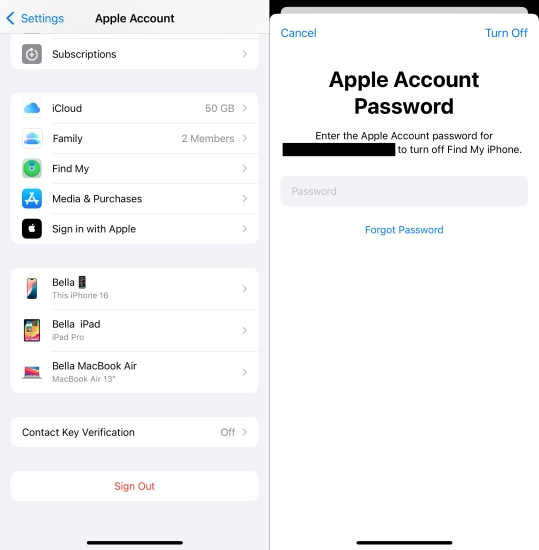
Step 1. In Settings on your iPhone, tap your Apple ID name.
Step 2. Scroll down to tap Sign Out, then enter your Apple ID password.
Step 3. After signing out, tap Sign In and enter your password again.
Solution 6. Check Your Apple ID on Another Device
If you have another iPhone or other Apple devices like Mac and iPad, you can check your Apple ID. By logging into your Apple ID, you can check whether the Trusted Devices list appears on the device, then troubleshoot the issue.
Step 1. On another Apple device, open the Settings app.
Step 2. Log in with your Apple ID and password.
Step 3. Check if the Trusted Devices list appears on that device.
Solution 7. Reset iPhone to Factory Settings
As a last resort, resetting all settings on your iPhone may resolve complex software issues affecting the Trusted Devices List. This action will erase your data so you can back up your device in advance.
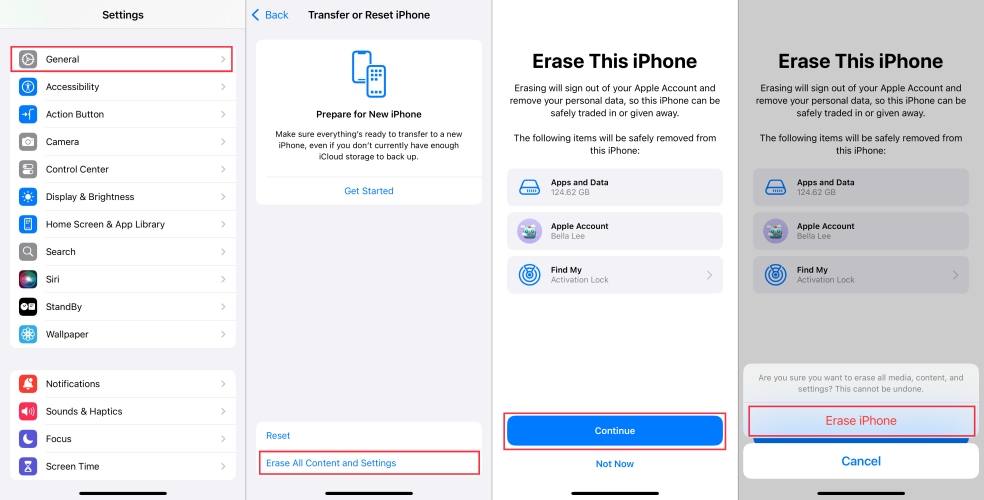
Step 1. Tap Settings > General, then select Transfer or Reset iPhone at the bottom.
Step 2. Tap Erase All Content and Settings and enter your passcode or Apple ID password.
Step 3. Confirm to erase your device by tapping Continue. Then your device will be completely erased.
Part 3. How to Add Trusted Devices on iPhone/iPad/Mac
After fixing the issue, you will see the list of trusted devices on your iPhone. However, if you haven't used the same Apple ID on other devices, then you cannot see any trusted devices in the list. So, you can manually add a trusted device to your Apple ID account, then you can view the devices associated with your Apple ID at the bottom of the screen on your iPhone. Here's how to.
On an iPhone or iPad
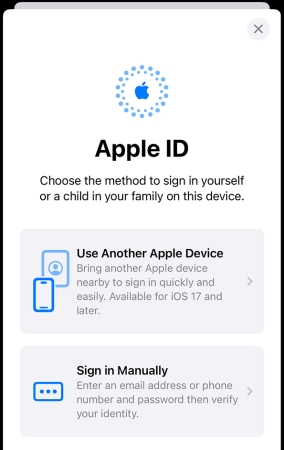
Step 1. Go to Settings, tap Sign in to your iPhone, then enter your Apple ID and password.
Step 2. When prompted, enter the six-digit verification code appearing on your another trusted device.
Step 3. Enter the verification code on the new device. Then your device will appear in the list of trusted devices on your another trusted device.
On Mac
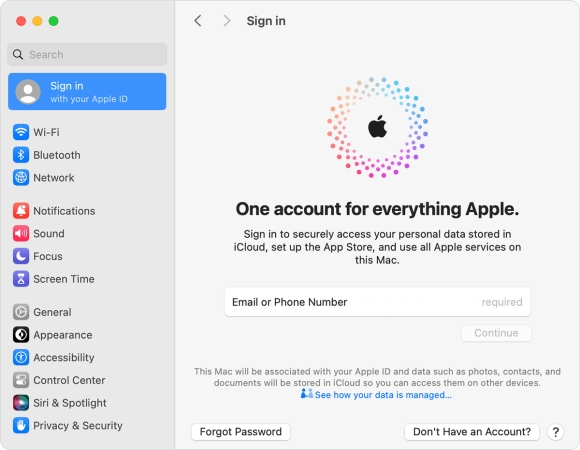
Step 1. Click Apple menu and choose System Preferences from the drop-down menu.
Step 2. In the pop-up window, click Sign in with your Apple ID at the top of the sidebar.
Step 3. Enter your Apple ID and password, then confirm to sign into your Apple ID on your another trusted device.
Part 4. Bonus Tip: How to Remove Apple ID without Password
When fixing the issue, you may need to sign out of your Apple ID on your iPhone. To sign out an Apple ID, you need to enter the password to confirm. However, some users would forget their Apple ID password. In this case, you can consider using an Apple ID removal like MagFone iPhone Unlocker to help you remove Apple ID without password.
MagFone iPhone Unlocker is designed to remove Apple ID, screen lock, MDM control, and Screen Time passcode. It can not only remove various locks from your iPhone, iPad, or iPod touch but also guarantee the security of data on your device. To quickly remove Apple ID without password, you can use MagFone iPhone Unlocker by following the steps below.
Key Features of MagFone iPhone Unlocker
* Security Verified. 5,481,347 people have downloaded it.
- Unlock various screen locks like Face ID and Touch ID on all iOS devices
- Remove Apple ID from iPhone and iPad without password and data loss
- Bypass Screen Time passcode and MDM restrictions without passcode
- Support the latest version of iOS and iPadOS, as well as, iOS devices
Step 1 Run MagFone iPhone Unlocker and Connect iPhone
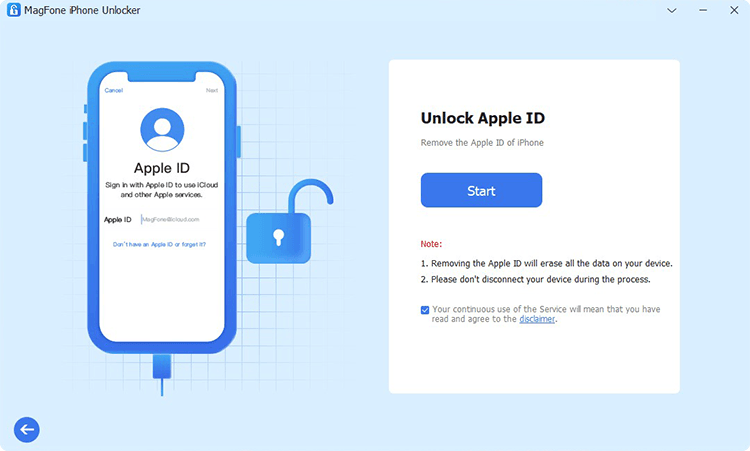
Start by opening MagFone iPhone Unlocker on your computer, then connect your iPhone to the computer by using a USB cable. After that, select Unlock Apple ID on the interface of MagFone software and click on the Start button.
Step 2 Check and Confirm the Status of Find My iPhone
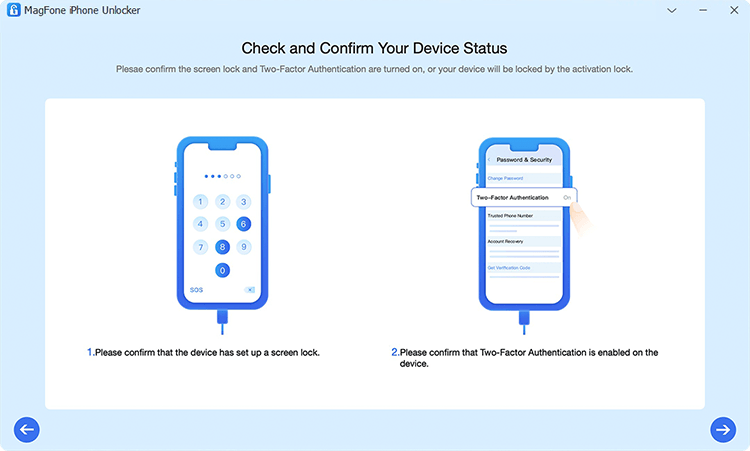
If your device have Find My iPhone disabled, you can directly skip this step. For those devices enabling Find My iPhone, you have to check whether you have set the screen lock passcode and enabled Two-Factor Authentication.
Step 3 Download and Verify the Firmware Package for iPhone
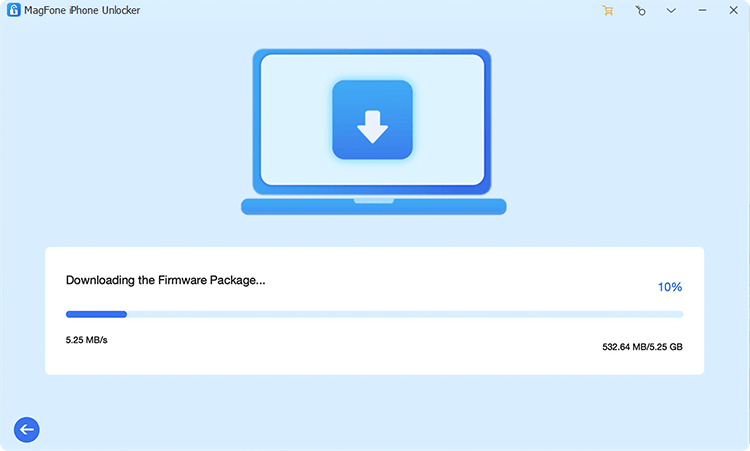
Next, carefully check the device information and then click the Download button. If the device information is inconsistent with your device, you can manually correct it. Also, you can select the firmware version for your device.
Step 4 Start to Remove Apple ID from iPhone Without Password
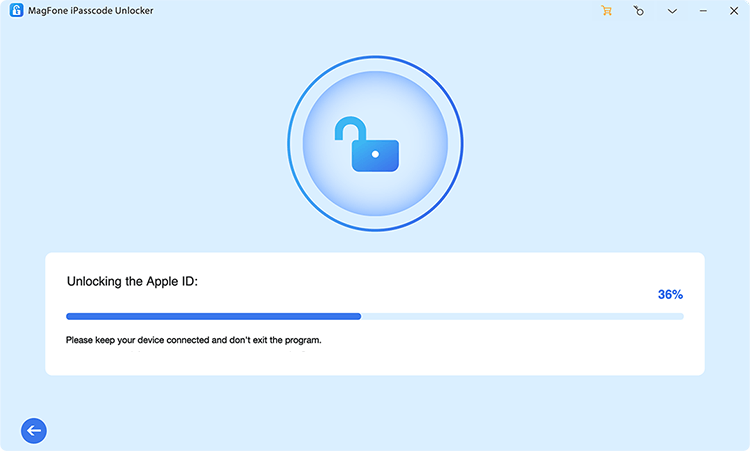
Once the download is complete, click on the Unlock button, and it will let MagFone iPhone Unlocker remove Apple ID from your iPhone. In the process of removing Apple ID, ensure your device stays connected until your Apple ID is removed.
Part 5. Conclusion
In the dynamic world of technology, occasional glitches are inevitable. However, armed with the right troubleshooting steps, users can overcome challenges related to that trusted devices list is not available on iPhone. By following the outlined solutions, users can ensure a seamless and reliable connection with their trusted devices. Last but not least, we recommend MagFone iPhone Unlocker to you. Have you a try, and fix the issue as soon as possible.

