I set up a 4 digit code on my phone, previous to that I had installed a replacement screen for my XS phone. All of the sudden my 4 digit code does not work! It's a code I've used for many many years! It's a number I can't forget, something weird is happening. What to do if my iPhone changed passcode by itself?"
It's a common complaint that the iPhone changed passcode on its own in the Apple community. Apple's iPhone remains one of the best smartphones on the market. And there are currently a number of different models to choose from. So it is hardly surprising that the iPhone passcode changed by itself. In this guide, we have rounded up several feasible methods to fix this problem. Let's check it out now!
- Part 1. Why Did My iPhone Passcode Change on Its Own?
- Part 2. Quick Way to Fix iPhone Changed Passcode by ItselfHOT
- Part 3. How to Fix iPhone Changed Passcode on Its Own
- Part 4. How to Set up a Passcode for iPhone after Repairing
- Part 5. FAQs about iPhone Passcode Changed by Itself
- Part 6. Conclusion
Part 1. Why Did My iPhone Passcode Change on Its Own?
Many iPhone users have found that their iPhone passcode changed from 4 to 6 digits by itself. But they don't figure out what causes the problem. It can be caused by various reasons, such as the bug with iPhone, iPhone data corruption, or security arrangement of Apple after system update. There are too many reasons that can affect the operation of the iPhone.
Cause 1. Human error
Human error is a common cause of passcode changes. This can happen when users accidentally alter their passcode or input a new one without realizing it.
Cause 2. Unauthorized access
Unauthorized access occurs when someone else gains control of your device and changes the passcode. This could be due to theft, borrowing, or hacking attempts.
Cause 3. Software bugs
Software bugs in the iOS operating system can sometimes lead to unexpected passcode changes. These bugs might be introduced during updates or due to specific configurations on the device.
Cause 4. iOS updates
iOS updates, while essential for security and functionality, can occasionally cause issues with passcodes. An update might reset the passcode or prompt for a new one due to changes in the system.
Cause 5. Hacked iPhone
A hacked iPhone is a serious security concern. If your device has been compromised, the attacker might change the passcode to gain further control or lock you out of your own device.
Part 2. Quick Way to Fix iPhone Changed Passcode by Itself
After figuring out what causes iPhone passcode changed by itself, you can resolve the problem now. There is an easier way to help you unlock your iPhone when it is locked by itself. Here you can try using an iPhone password unlocking tool - MagFone iPhone Unlocker. It is an easy-to-use yet professional unlocking tool that supports deleting various locks like 4-digit and 6-digit passcode on the iPhone, iPad, and iPod touch.
By adopting an advanced unlocking technique, MagFone iPhone Unlocker can remove Apple ID from iPhone, iPad, and iPod touch without password. Also, if you want to turn off Screen Time passcode or bypass MDM restrictions on all Apple mobile devices, you can use MagFone iPhone Unlocker to get it done. Here's an easy step-by-step guide to solve iPhone passcode changed by itself via MagFone iPhone Unlocker.
Key Features of MagFone iPhone Unlocker
* Security Verified. 5,481,347 people have downloaded it.
- Unlock various screen locks like Face ID and Touch ID on all iOS devices
- Remove Apple ID from iPhone and iPad without password and data loss
- Bypass Screen Time passcode and MDM restrictions without passcode
- Support the latest version of iOS and iPadOS, as well as, iOS devices
Step 1 Connect iPhone to Computer and Launch MagFone
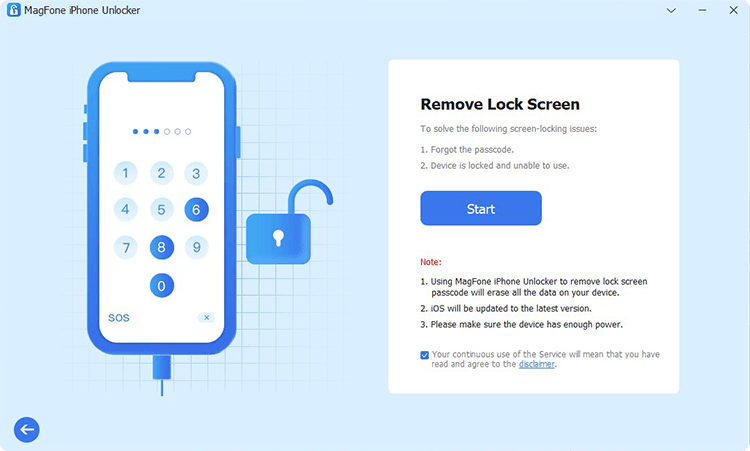
First of all, connect your iPhone to your computer through a USB cable. Then pull up MagFone iPhone Unlocker on the computer. After MagFone detects your iPhone, select the Remove Lock Screen option and click on the Start button.
Step 2 Go to Boot iPhone into DFU Mode
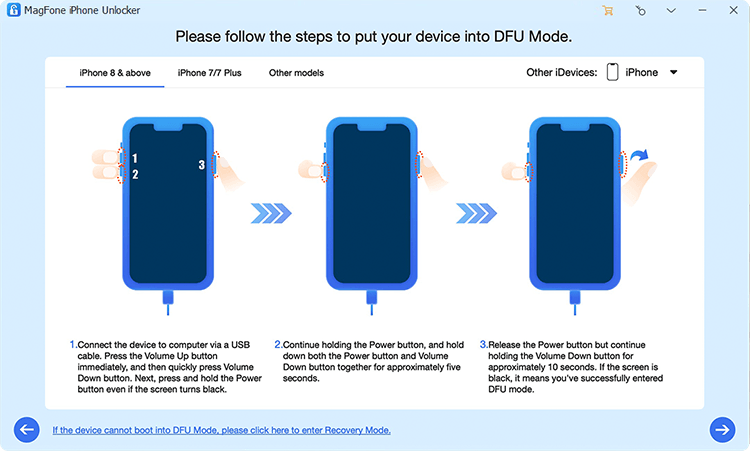
The next step is to manually put your device into DFU mode fore fixing the iPhone passcode changed on its own. Simply follow the on-screen instructions to boot your device into DFU mode.
Step 3 Download the Matching Firmware Package
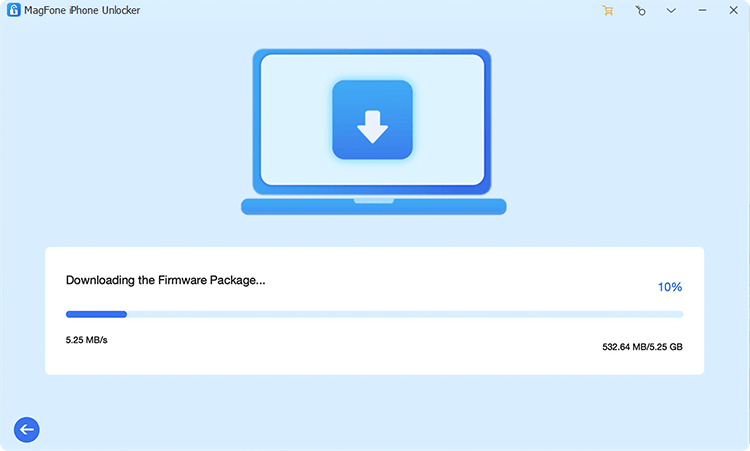
After entering into the DFU mode, you need to check the information of your device displayed on the software. Make sure all the information isn't wrong, or you need to correct it. Then click on the Download button to download the firmware package.
Step 4 Remove Screen Passcode from iPhone
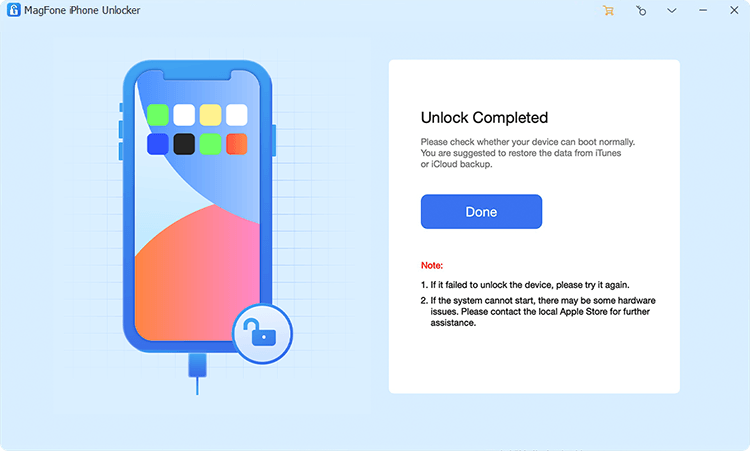
Once completing the download of the firmware package, then you can click on the Unlock button to begin removing the screen passcode from your iPhone. Remember that your device needs to be connected to the computer in the whole process. Finally, you can restart your device.
Part 3. How to Fix iPhone Changed Passcode on Its Own
In addition to using an iPhone passcode unlocker, there are still four other methods to fix the iPhone passcode changed itself problem as much as possible. But before we dive into the detailed steps of each method, let's talk about the differences among the methods. From the information shown in the table below, you will know which way is much more suitable for you.
| Use Security Lockout | Use iTunes | Use iCloud | Use Find My App | Use MagFone iPhone Unlocker | |
| Apple ID and Password | √ | × | √ | √ | × |
| Activation Required | × | × | √ | √ | × |
| Operation Steps | Easy | A little complex | A little complex | A little complex | Easy |
| Success Rate | High | High | High | High | Almost 100% |
| Recommendation | ★★★★ | ★★★★ | ★★★★ | ★★★★ | ★★★★★ |
Method 1. Fix iPhone Changed Passcode Itself via Security Lockout
The iPhone running iOS 15.2 or later allows the user to directly erase the passcode when it is disabled. Only if you can remember your Apple ID password, you will be able to remove the passcode and unlock your iPhone without a passcode or computer. Here's how to make use of Security Lockout for unlocking iPhone without passcode.
On iPhone running from iOS 15.2 to iOS 17
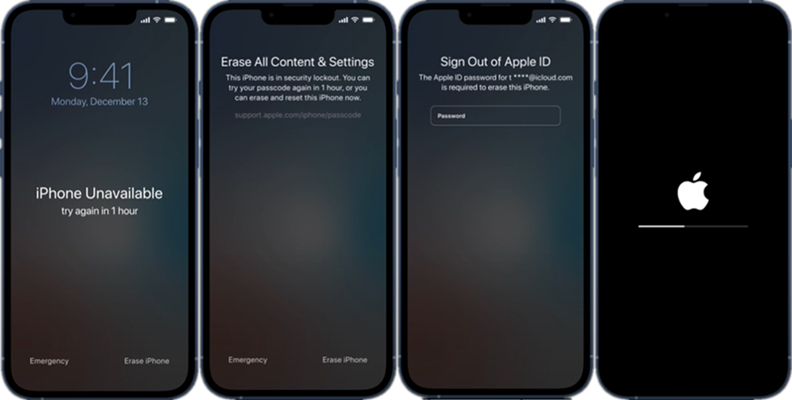
Step 1. Enter your passcode until the iPhone Unavailable screen appears.
Step 2. On the iPhone Unavailable screen, tap Erase iPhone at the bottom right corner.
Step 3. Tap Erase iPhone again and enter your Apple ID password for signing out of Apple ID.
Step 4. After signing out of Apple ID, tap Erase iPhone to confirm that you want to erase all the data and settings. Then the passcode will be removed from your device.
On iPhone running iOS 17 or later
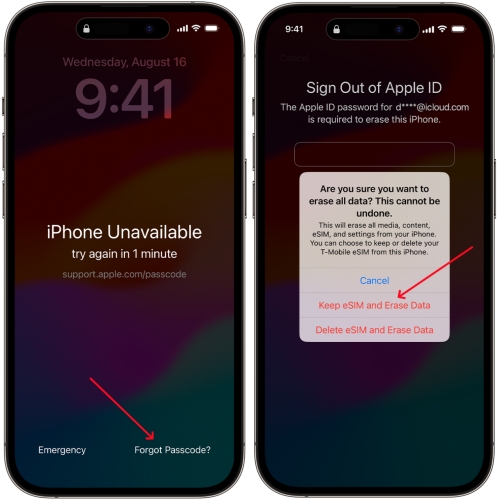
Step 1. Enter your passcoee until the iPhone Unavailable screen appears.
Step 2. Tap the Forgot Passcode? option in the bottom corner of the screen.
Step 3. On the Security Lockout screen, tap Start iPhone Reset to confirm.
Step 4. Enter your Apple ID password to sign out of your Apple ID on your device.
Step 5. Tap Erase iPhone to permanently delete all of your data and settings. Then you'll be able to set up your device again.
Method 2. Fix iPhone Changed Passcode Itself via iTunes
To fix the iPhone passcode randomly changed problem, you can use iTunes to restore your device. As a multi-functional tool, iTunes enables you to not only manage your media files but also restore various issues related to the iPhone, iPad, and iPod touch. If you have your computer by your iPhone, then you can solve this issue by following the steps below.
On a trusted computer
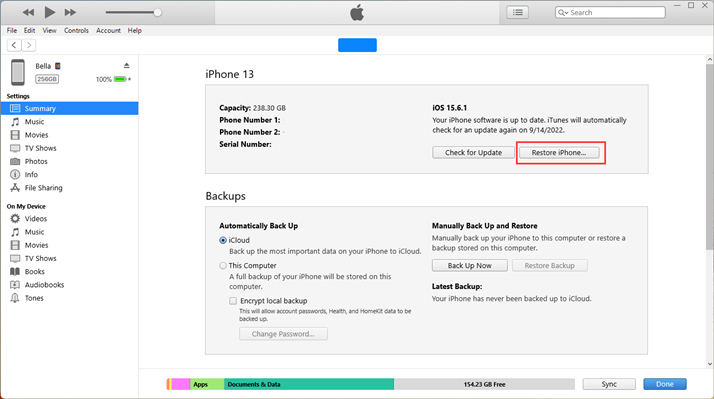
Step 1. Use a USB cable to connect your iPhone to your computer, then open iTunes.
Step 2. Click your device icon in iTunes and go to the Summary tab.
Step 3. Select the Restore iPhone option and click the Restore button again to confirm.
On an untrusted computer
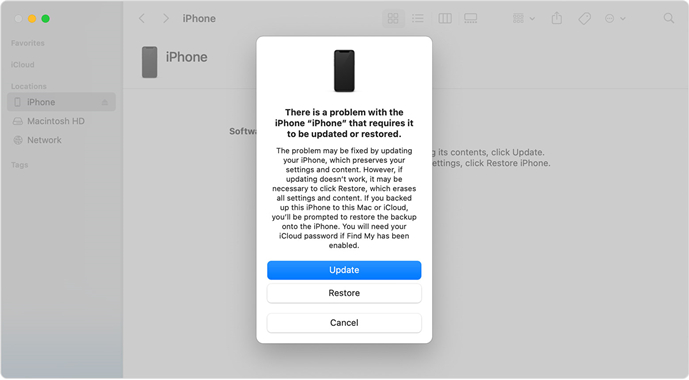
Step 1. Use a USB cable connect between your iPhone and a computer, then open iTunes.
Step 2. Power off your iPhone and go to place your device into recovery mode.
Step 3. In iTunes, click the Restore button on the pop-up window.
After restoring your iPhone, the problem with your device will be resolved. But if your iPhone isn't synced with your computer, you are not able to directly use iTunes or the Finder to fix the problem. In this situation, you need to put your device into recovery mode first. Then you can use iTunes or the Finder to restore it.
Method 3. Fix iPhone Changed Passcode Itself via iCloud
In addition to using iTunes, you can also troubleshoot the iPhone changed passcode itself problem via iCloud. Make sure that the Find My features is enabled on your iPhone. Then you can go to iCloud.com and then remove passcode from your iPhone. Now follow the steps below to start fixing the problem.
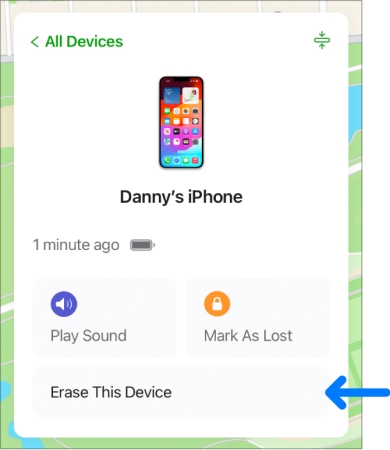
Step 1. Head to iCloud.com and enter your Apple ID credentials for logging in.
Step 2. Click the Find My button, then click the All Devices button on the top of the new window.
Step 3. From the drop-down list, select your iPhone and click the Erase This Device button in the pop-up window.
Step 4. Click the Erase iPhone button and enter your Apple ID password to confirm.
iCloud can help you remotely erase all the data and settings on your iPhone. So, you can remove the passcode on your device and set it up again. By restoring iPhone at iCloud.com, you need to activate your device when you restart it.
Method 4. Fix iPhone Changed Passcode Itself via Find My App
If you have more than one Apple device, you can use the Find My app to remotely erase your iPhone, which can remove the passcode on your device. With the help of the Find My app, you can easily fix the iPhone changed passcode by itself problem. But make sure that you can remember your Apple ID password. Here's how to.
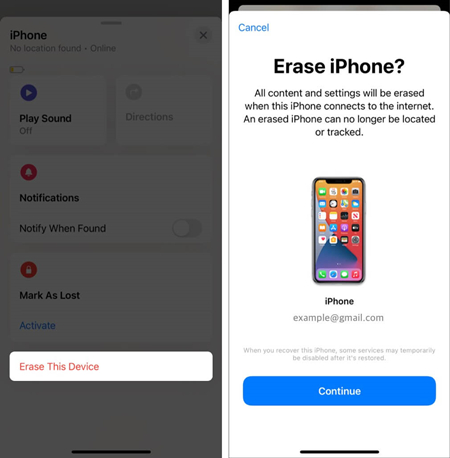
Step 1. On your another Apple device, open the Find My app.
Step 2. Tap Devices at the bottom of the screen and find your iPhone.
Step 3. Scroll down to tap Erase This Device, then tap Continue.
Step 4. Enter your trusted phone number and tap Erase to confirm.
Part 4. How to Set up a Passcode for iPhone after Repairing
After successfully fixing the problem, you can create a new passcode for your iPhone. If you use an iPhone with the Home button, you can use your fingerprint. Or you can use face recognition if your iPhone supports Face ID. But you need to use a passcode for your iPhone to avoid Touch ID or Face ID not working. Here's how to set a passcode on the iPhone.
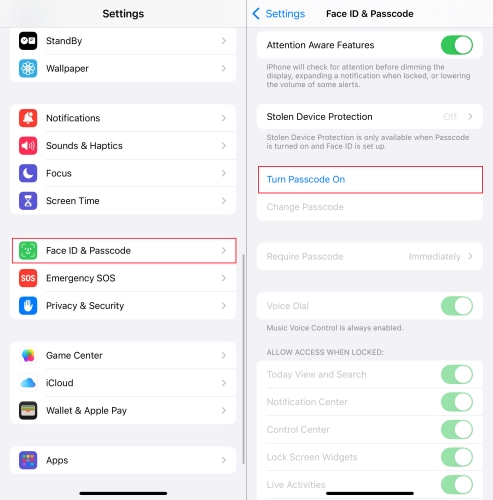
Step 1. Go to Settings, then tap Face ID & Passcode or Touch ID & Passcode.
Step 2. Tap Turn Passcode On to enter a new passcode. Or tap Passcode Options to select a passcode.
Part 5. FAQs about iPhone Passcode Changed by Itself
Q1. How to back up iPhone before repairing?
A1: The process of fixing iPhone passcode changed itself will erase all the content and settings on your iPhone. Provided that your iPhone has kept in sync with your iCloud, you don't need to worry about the data loss and can directly restore it. If you are not out to lose any data and information on your device, you can make a backup of your device in advance.
Back up iPhone with iTunes on PC
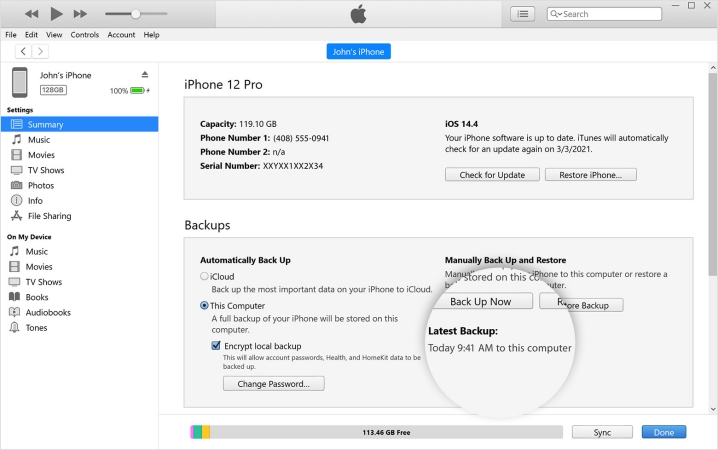
Step 1. Open iTunes on your Windows PC and connect your iPhone to the computer with a USB cable.
Step 2. Select your device in iTunes and click Summary then click on the Back Up Now button.
Back up iPhone with Finder on Mac
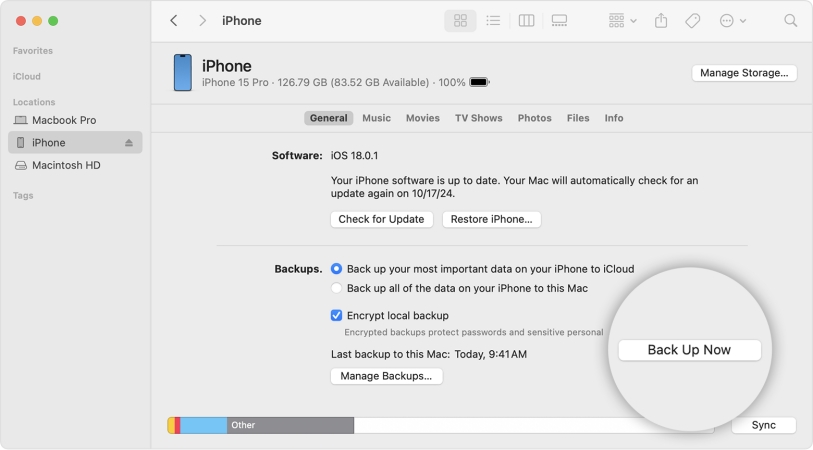
Step 1. Connect your iPhone and your computer with a cable and select your device in the Finder sidebar on your Mac.
Step 2. Click General and select Back up all of the data on your iPhone to this Mac then click on the Back Up Now button.
Q2. How to unlock iPhone without passcode or Face ID?
A2: To unlock your iPhone without passcode or Face ID, you can follow the methods introduced in Part 3. If you want to quickly unlock your iPhone without passcode or Face ID, you can use an iPhone unlocking tool like MagFone iPhone Unlocker.
Q3. How to bypass iPhone passcode without Apple ID?
A3: If you want to bypass iPhone passcode without Apple ID, you can directly use an iPhone unlocker like MagFone iPhone Unlocker. Or you can use iTunes on a PC or the Finder on a Mac to restore your iPhone to delete the passcode.
Part 6. Conclusion
If you have the iPhone passcode changed itself problem, simply read this article and go to try the methods introduced above. You can use iTunes or iCloud to erase the passcode on your iPhone. Of you can delete the passcode by using MagFone iPhone Unlocker. If you still have other problems, leave a comment on our webpage.

