iPad restrictions, often used to limit access to certain content or apps, are particularly useful for parental controls or work-related limitations. However, there may come a time when you need to disable these restrictions to regain unrestricted access to the iPad's features, settings, and apps. Unlocking all of your iPad's functionalities by turning off restrictions can greatly enhance your experience with the iPad. This guide provides a comprehensive overview of how to turn off restrictions on iPad, both with and without a passcode or Apple ID, so that you can easily take control of your iPad.
- Part 1. What Happens When Turn Off iPad Restrictions?
- Part 2. Video Demo: How to Disable Restrictions on iPad
- Part 3. How to Take Off Restrictions on iPad with Passcode
- Part 4. How to Turn Off Restrictions on iPad with Apple ID Password
- Part 5. How to Remove iPad Restrictions with Screen Time Remover
- Part 6. Conclusion
Part 1. What Happens When Turn Off iPad Restrictions?
When you turn off restrictions on your iPad, all previously blocked apps, websites, and features become fully accessible again. Restrictions are often set to limit certain functions, content, or apps on the device—especially useful for parental controls or business settings. Once these restrictions are removed, the device operates without limitations, allowing users to browse freely, and access all installed apps. You can disable the iPad restrictions if you're restoring an iPad for personal use or require more functionality for work or school purposes.
Part 2. Video Demo: How to Disable Restrictions on iPad
This video tutorial provides a step-by-step guide on how to turn off restrictions on an iPad. These video demos are highly valuable as they visually guide you through the entire process, making it easy to follow along.
Watching a video demo offers clarity on any complicated steps. When you're not convenient to watch this video at that moment, you can proceed to read. Below is a comparison table outlining each method discussed, helping you quickly determine which approach best fits your needs.
| Methods | Screen Time Passcode | Apple ID Password | Data Loss | Difficulty |
|---|---|---|---|---|
| Passcode | ✔️ | ❌ | ❌ | ⭐⭐ |
| Settings | ❌ | ✔️ | ❌ | ⭐⭐ |
| iTunes | ❌ | ✔️ | ✔️ | ⭐⭐⭐ |
| iCloud.com | ❌ | ✔️ | ✔️ | ⭐⭐⭐ |
| Find My App | ❌ | ✔️ | ✔️ | ⭐⭐ |
| Screen Time Remover | ❌ | ❌ | ❌ | ⭐ |
Part 3. How to Take Off Restrictions on iPad with Passcode
If you know the Screen Time passcode, it is one of the most straightforward methods to turn off restrictions on your iPad by using it. This gives you direct access to the restriction settings and allows you to disable them at any time.
For iPadOS 12 or later:
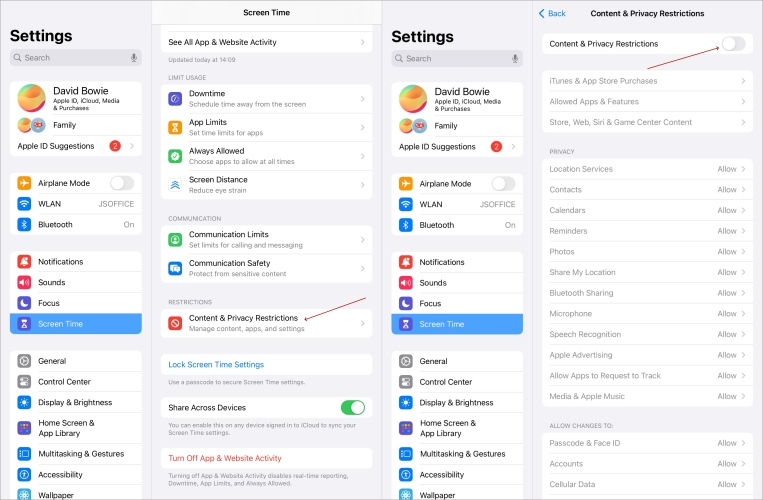
Step 1. Launch the Settings app.
Step 2. Hit Screen Time and then swipe up to press the Content & Privacy Restrictions option.
Step 3. Switch it off by entering your Screen Time passcode.
For iPadOS 11 or earlier:
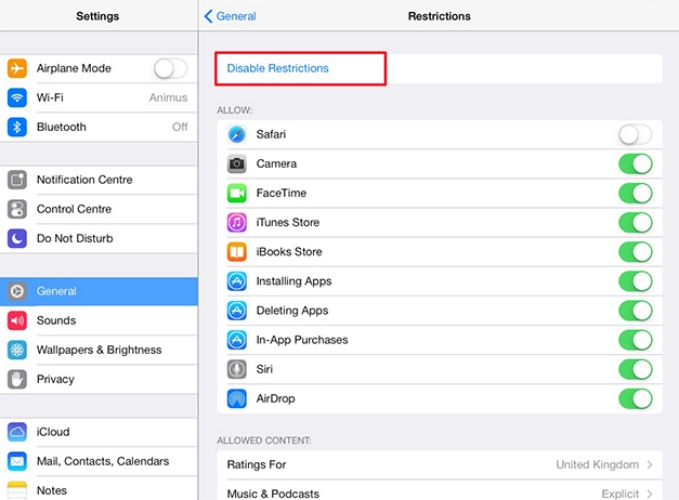
Step 1. Enter Settings.
Step 2. Head to General and press on Disable Restrictions.
Step 3. Next, input the Screen Time passcode to switch it off.
Part 4. How to Turn Off Restrictions on iPad with Apple ID Password
If you do not remember the passcode but have access to your Apple ID password, you can use it to remove restrictions. Apple offers several methods using your Apple ID, each offering a slightly different approach depending on your preferences and available resources. Let's explore each option for turning off iPad restrictions using your Apple ID.
Method 1. Delete iPad Restrictions in Settings
Using your Apple ID makes this process secure and simple, as you are not required to remember the Screen Time passcode specifically. This method is ideal for users who have already linked their Apple ID with the iPad's restriction settings.
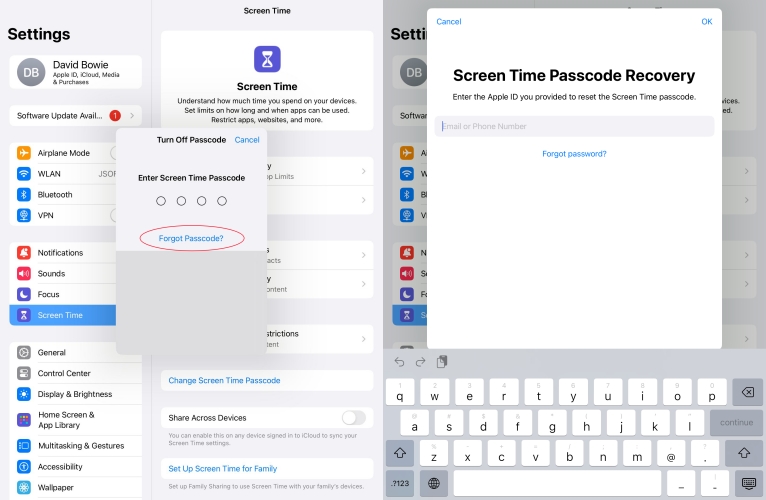
Step 1. Run the Settings app.
Step 2. After selecting Screen Time, tap on Change Screen Time Passcode.
Step 3. Pick the Turn Off Screen Time Passcode option and touch Forgot Passcode.
Step 4. Finally, type your Apple ID password.
Method 2. Turn Off iPad Restrictions in iTunes
iTunes provides a practical solution for managing and adjusting your iPad's restriction settings if you have synced your device with iTunes before. By connecting your iPad to iTunes, you can restore your iPad to factory settings and take off the iPad restrictions.
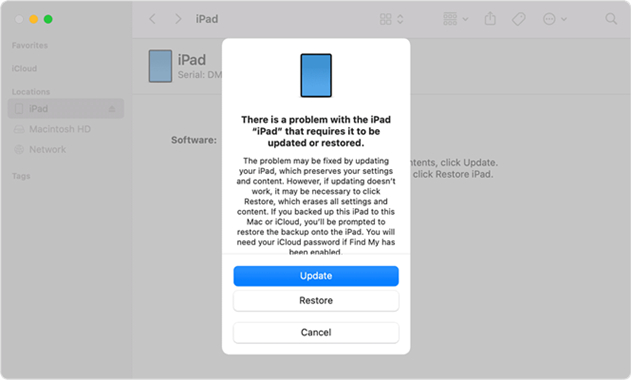
Step 1. To begin with, get your iPad into recovery mode.
Step 2. Link this iPad and your PC, then continue to launch iTunes.
Step 3. After picking Restore on the screen, you should wait until the process is finished.
Method 3. Get Off iPad Restrictions at iCloud.com
Using iCloud.com to remove restrictions is another effective option, especially for managing your device remotely. This method enables you to turn off restrictions by erasing your iPad. It's convenient if you're away from your iPad and the Find My iPad is enabled.
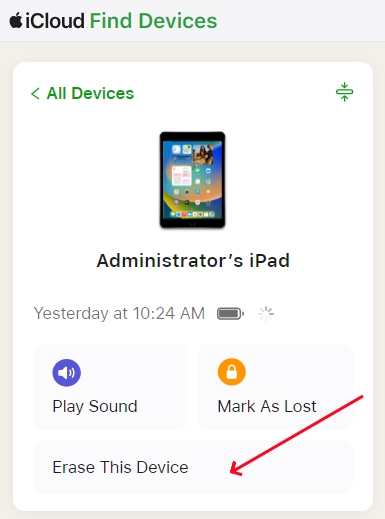
Step 1. Log into iCloud.com using your Apple ID account.
Step 2. On iCloud.com, click the Find My icon and choose your iPad in the devices list.
Step 3. Select Erase This Device, and then type the Apple ID password when asked.
Step 4. Confirm by clicking the Erase iPad option again.
Method 4. Take Off iPad Restrictions on Find My App
You can also utilize the Find My app to remove the iPad restrictions with your Apple ID. This app-based approach works well if Find My is activated and linked to your iPad. By doing that, you can take off the restrictions of your iPad on another device.
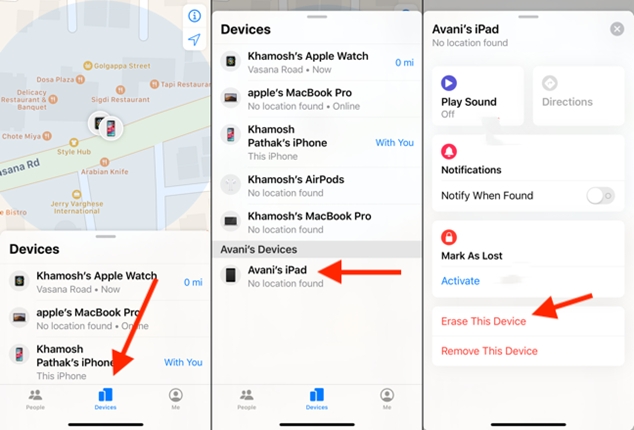
Step 1. Access the Find My app.
Step 2. Find and press your iPad with restrictions.
Step 3. Tap Erase This Device and input your Apple ID password. Then select Erase iPad one more time.
Part 5. How to Remove iPad Restrictions with Screen Time Remover
To seamlessly and efficiently remove the iPad restrictions, the MagFone iPhone Unlocker stands out as an excellent tool. MagFone is created to help users unlock Screen Time passcodes and disable restrictions without an Apple ID or original passcode. It's ideal for those who may have forgotten these details. With MagFone's intuitive interface, you can quickly access your device with just a few steps. Besides, the MagFone iPhone Unlocker has a high success rate for unlocking different restrictions on your iPhone, iPad, and iPod touch. Now let's move on to follow the specific steps.
Key Features of MagFone iPhone Unlocker
* Security Verified. 5,481,347 people have downloaded it.
- Unlock various screen locks like Face ID and Touch ID on all iOS devices
- Remove Apple ID from iPhone and iPad without password and data loss
- Bypass Screen Time passcode and MDM restrictions without passcode
- Support the latest version of iOS and iPadOS, as well as, iOS devices
Step 1 Launch MagFone iPhone Unlocker
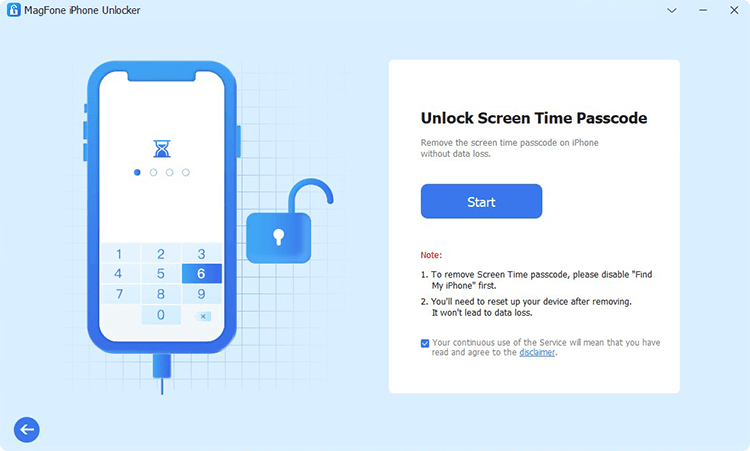
Connect your iPad to your computer using a USB cable, then run MagFone iPhone Unlocker on that computer. Once the iPad is detected, choose Unlock Screen Time Passcode from the main menu on MagFone.
Step 2 Begin Removing iPad Restrictions
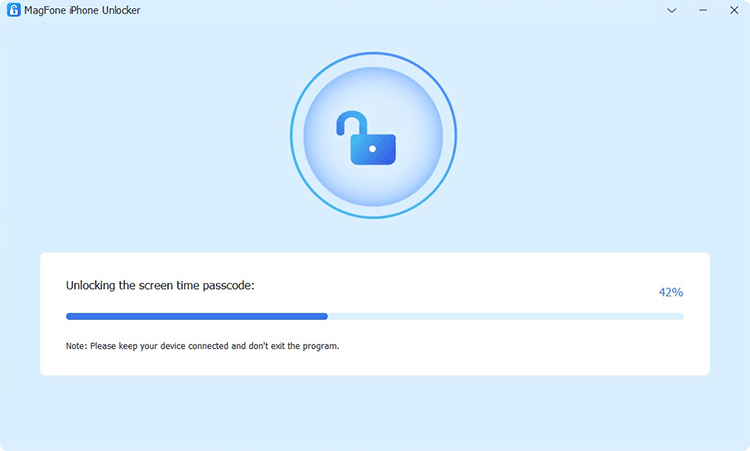
Ensure the Find My iPad feature is turned off. If it's on, enter Settings > [Your Profile] > Find My icon, and switch it off. Once disabled, click on Start on the screen to begin removing the Screen Time restrictions.
Step 3 Continue to Finish iPad Setup
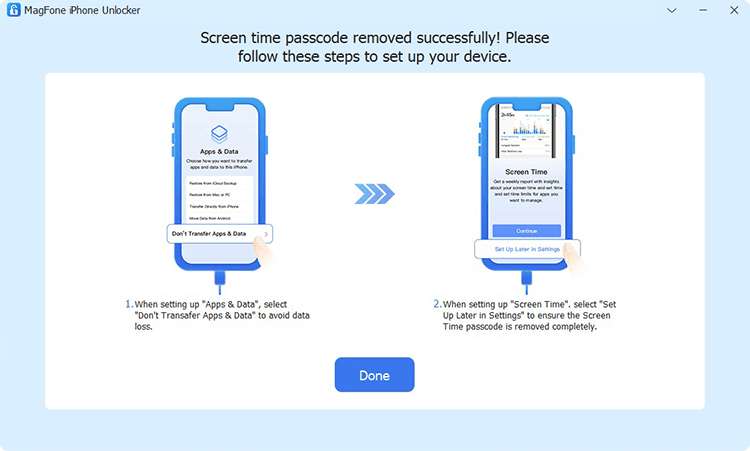
After successfully removing restrictions, follow the onscreen steps to set up your iPad. On the Apps & Data screen, select Don't Transfer Apps & Data and then complete the setup process on this iPad.
Part 6. Conclusion
In conclusion, turning off restrictions on your iPad is achievable by using the methods in this article, each offering flexibility based on your access to a passcode or Apple ID. For users seeking a streamlined solution, MagFone iPhone Unlocker is an efficient way to unlock the iPad restrictions and doesn't need any passcode.

